Gemini is Google’s most capable and general AI model, designed to be multimodal and optimized for different sizes.
It is also the name for Google’s AI chatbot that uses the Gemini LLM (large language model) to simulate human conversations.
Gemini enhances Google’s products and services, providing tools for developers and businesses.
This guide will take you through the Google Gemini API, enabling the creation of sophisticated AI-driven applications with a Python Streamlit app as an example. This simple Streamlit app can process textual input or a prompt to produce response with context-aware results.
With the Gemini AI API, we can effortlessly integrate advanced AI features into our projects for a smooth and effective addition of state-of-the-art artificial intelligence functionalities.
For this article, let’s start building a simple Streamlit app to test the Gemini AI models.
What is Gemini AI?

Gemini, which was previously known as Bard, is an AI chatbot developed by Google. It operates on the large language model (LLM), sharing its previous name, and was introduced in 2023 as a reaction to the growing popularity of OpenAI’s ChatGPT.
Earlier versions were built on the LaMDA and PaLM LLM frameworks.
Gemini AI is an advanced artificial intelligence model developed through a collaboration among Google’s teams, including Google Research and Google DeepMind. It is a multimodal AI, capable of understanding and processing a variety of data types such as text, code, audio, images, and videos.
The teams at Google DeepMind have been motivated by the desire to use artificial intelligence to benefit humanity. Gemini AI represents progress in the creation of a new AI model generation that is modeled after human perception and interaction with the environment.
Gemini AI stands out as Google’s most intricate and extensive AI model to date. It is adaptable and can manage diverse information types. Its design enables it to function well across different platforms, from powerful servers in data centers to mobile devices.
The following are three specialized versions of the Gemini models, each tailored for specific applications:
- Gemini Ultra: This is the most sophisticated variant, designed for complex tasks.
- Gemini Pro: Offers a balance between performance and the ability to scale.
- Gemini Nano: Specially designed for mobile devices, it is efficient and effective.
Among the different versions, Gemini Ultra has shown outstanding results, even outperforming GPT-4 in several aspects, as it’s also comparable to the latest GPT-4.1, GPT-4.5, Grok xAI and other Claude AI models. It stands as the initial model to surpass human experts in the Massive Multitask Language Understanding benchmark.
This benchmark evaluates knowledge of the world and the capacity to solve problems in 57 areas of study. Gemini Ultra’s achievement is evidence of its advanced understanding and problem-solving skills.
- Getting Started with GPT-4.5: Testing the GPT-4.5 API
- Getting Started with Anthropic Claude API: A Practical Guide
- Getting Started with kluster.ai for Scalable AI
- Getting Started with Groq: Building and Deploying AI Models
- Getting Started with OpenRouter
- Getting Started With Google SERP Scraping With SerpApi
Getting Started with Gemini AI API
There are two methods for connecting to the Gemini AI API. The simplest and most straightforward method involves using the free plan through Google AI Studio, which I will explain shortly.
For those who need more flexibility and the ability to integrate with additional models, it is possible to establish a connection using Google Vertex AI Model Garden.
Gemini AI API Pricing
Gemini API offers two different pricing options. The complimentary tier does not keep your data private, which means Google might use the information you provide to enhance their future models.
On the other hand, the premium tier, accessible through Google Vertex AI, comes with a more complex setup but offers increased data protection. Below is an overview of both options.
The Gemini API’s no-cost tier lets users access certain features within set limits:
- Up to 15 requests each minute
- A maximum of 1 million tokens per minute
- A daily limit of 1,500 requests
However, this tier does not provide context caching, so you cannot save persistent long prompts on Google Cloud’s servers.
While free usage is enticing, bear in mind that any data inputted, including prompts and responses, may contribute to the training of Google’s models.
Therefore, avoid using sensitive information with this tier to prevent it becoming part of Gemini’s training dataset.
The Gemini API also has a usage-based pricing structure, similar to other services in the market. The costs vary, with lower charges for inputs and higher for outputs, and an additional fee for context caching.
The pricing fluctuates according to prompt size, with prompts exceeding 128,000 tokens incurring double the cost. Here’s the detailed pricing:
- Inputs are charged at $0.35 per million tokens
- Outputs at $1.05 per million tokens
- Context caching costs $0.08 per million tokens
Using the pay-as-you-go plan ensures your data remains private and is not used for model training. To use this option, it’s necessary to operate the Gemini API through Vertex AI and may require coding skills or the assistance of a developer.
For more detailed information about the Gemini AI API pricing, please refer to the Gemini Developer API Pricing page.
Get Gemini AI API Key
Before we begin to utilize the API, we need to acquire the API key from Google AI Studio.
1. Create a Google AI Studio account
With an active Gmail account, you can easily access the Gemini API website and sign in. Follow the available steps.
2. Generate an API Key
After signing in to Google AI Studio, please review, agree to, and close any informational pop-up windows that appear. Then you can access the API key page directly with this link if you’re not redirected immediately.
In this area, you have the opportunity to experiment with the Gemini models, where you can modify some elementary settings located on the right side of the interface.
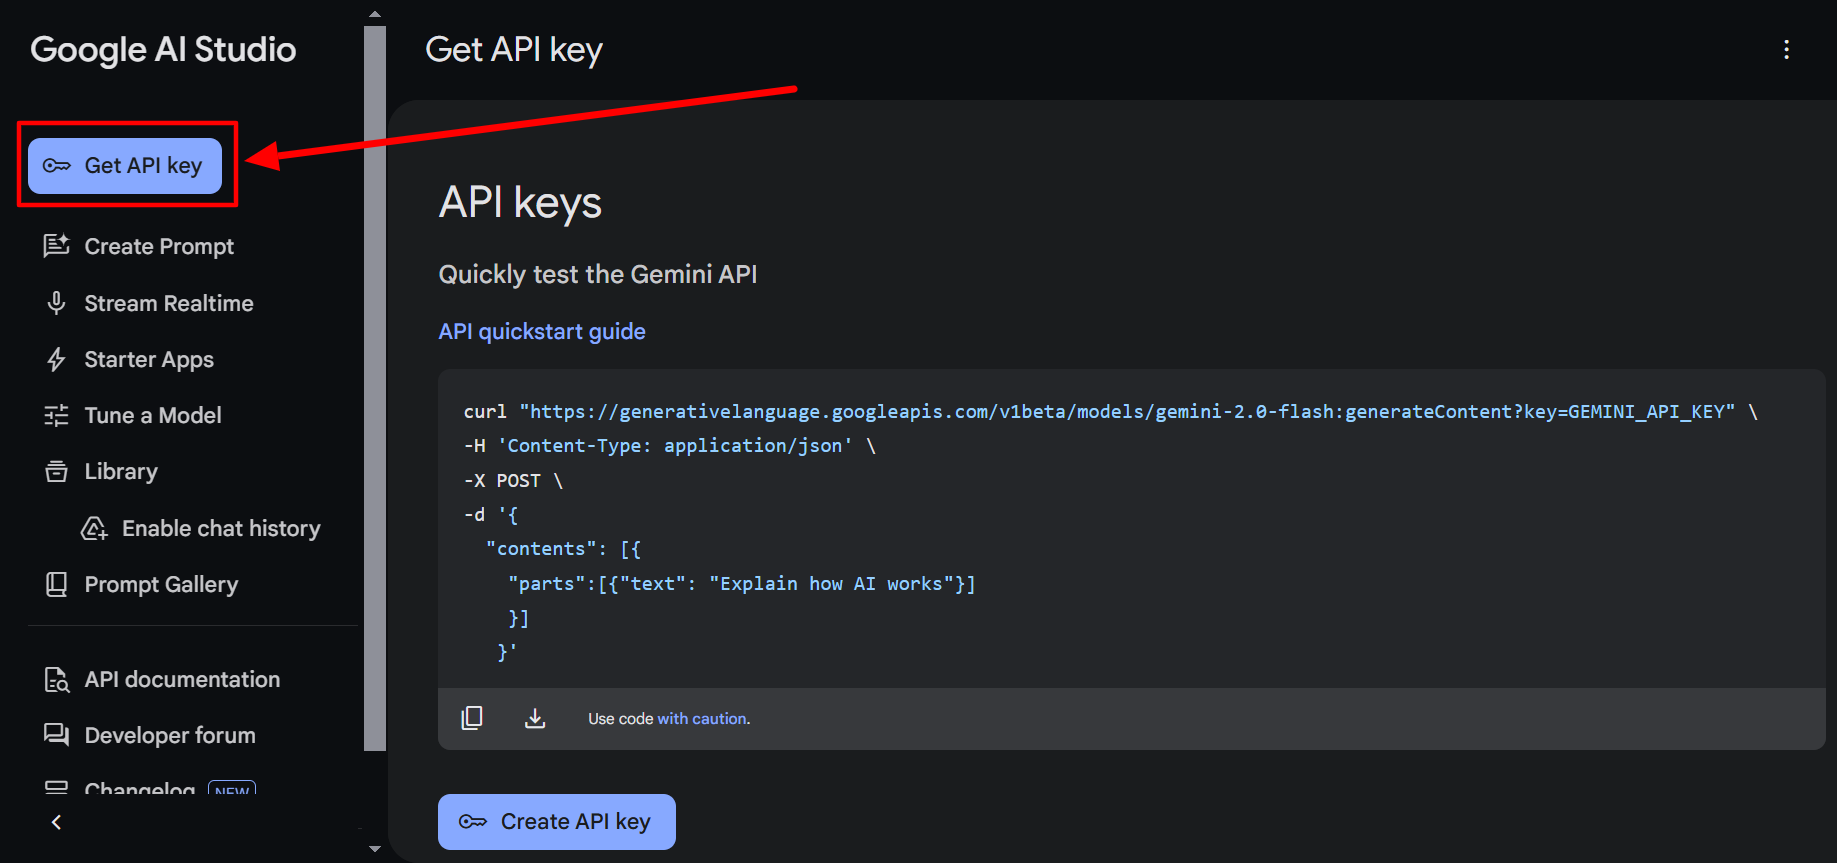
At the upper left corner of the interface, select the button labeled “Get API key“. Then on the bottom, click the Create API key button to start generating your API key.
A window will appear to select which Google Cloud project you want to link this API to:
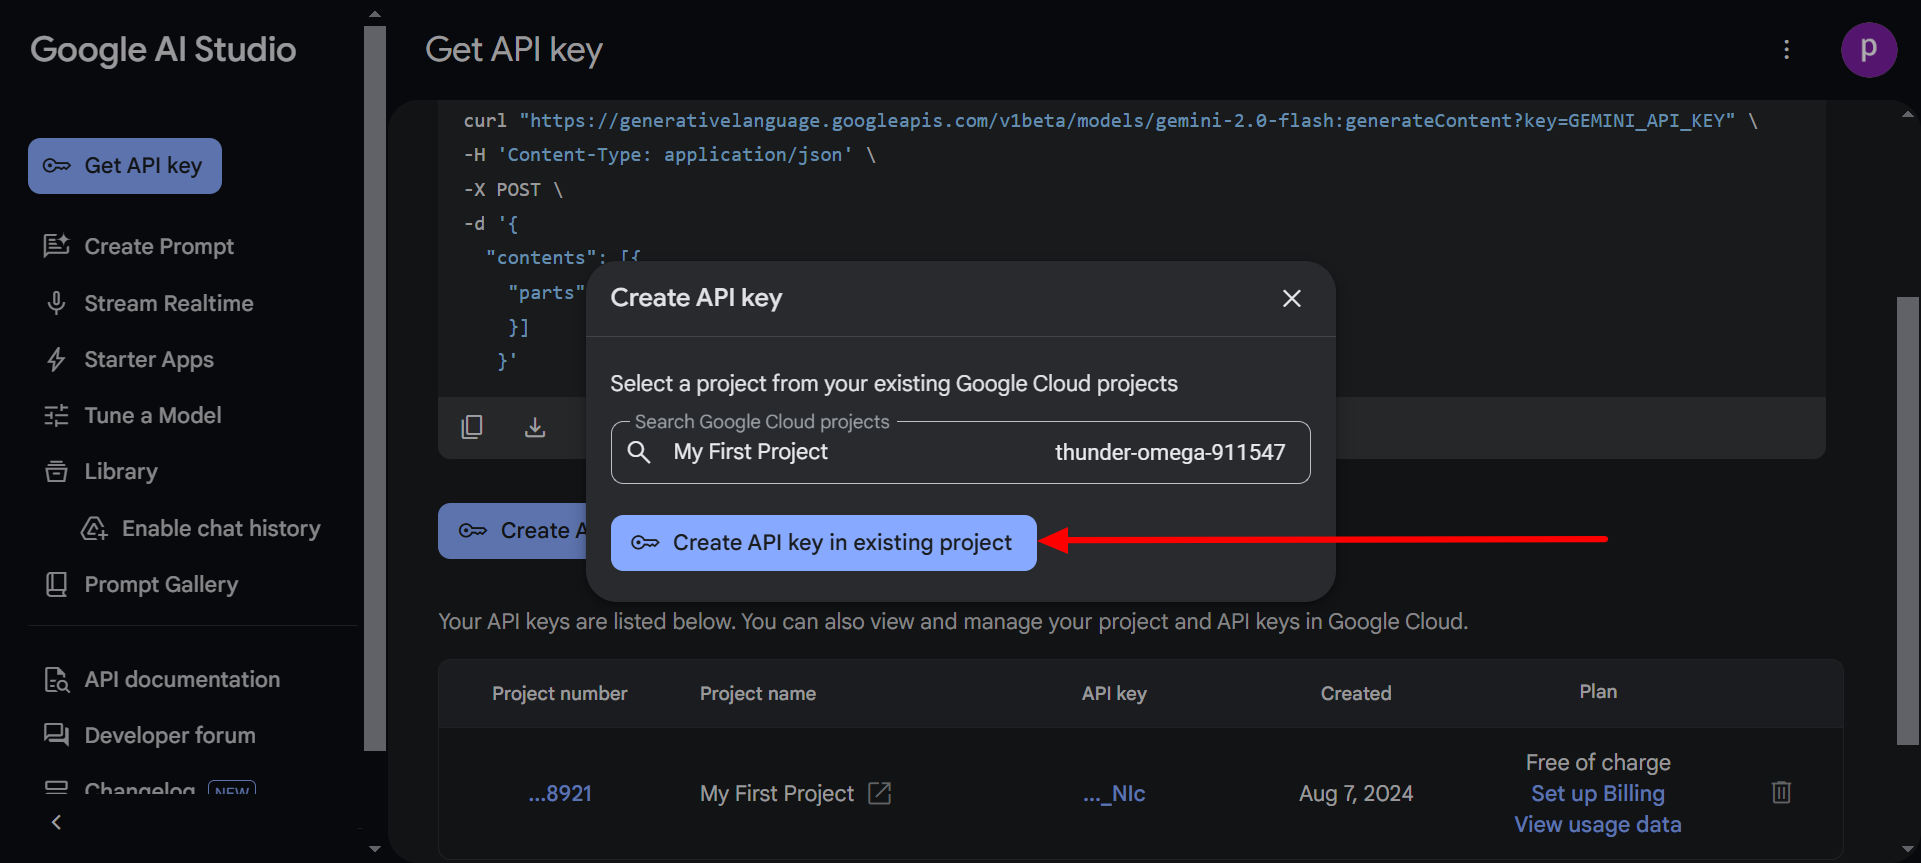
Select an existing project or create a new one specific for testing this Gemini AI API. Choose whichever option you like. In my case, I click the Create API key in existing project button.
Copy and store your API key elsewhere in a private vault and safe place as you might not be able to see it again later and never ever share it with anyone else, especially online.
3. Test a Simple Request with Curl
As you can see, Google provides a quickstart guide to test running your first API request on the dashboard:
curl "https://generativelanguage.googleapis.com/v1beta/models/gemini-2.0-flash:generateContent?key=GEMINI_API_KEY" \
-H 'Content-Type: application/json' \
-X POST \
-d '{
  "contents": [{
    "parts":[{"text": "Explain how AI works"}]
    }]
   }'
Just change the GEMINI_API_KEY value your newly generated API key.
We can also use API testing clients like Postman or HTTPie to run our first Gemini AI API call. In my case, I use HTTPie like the following:
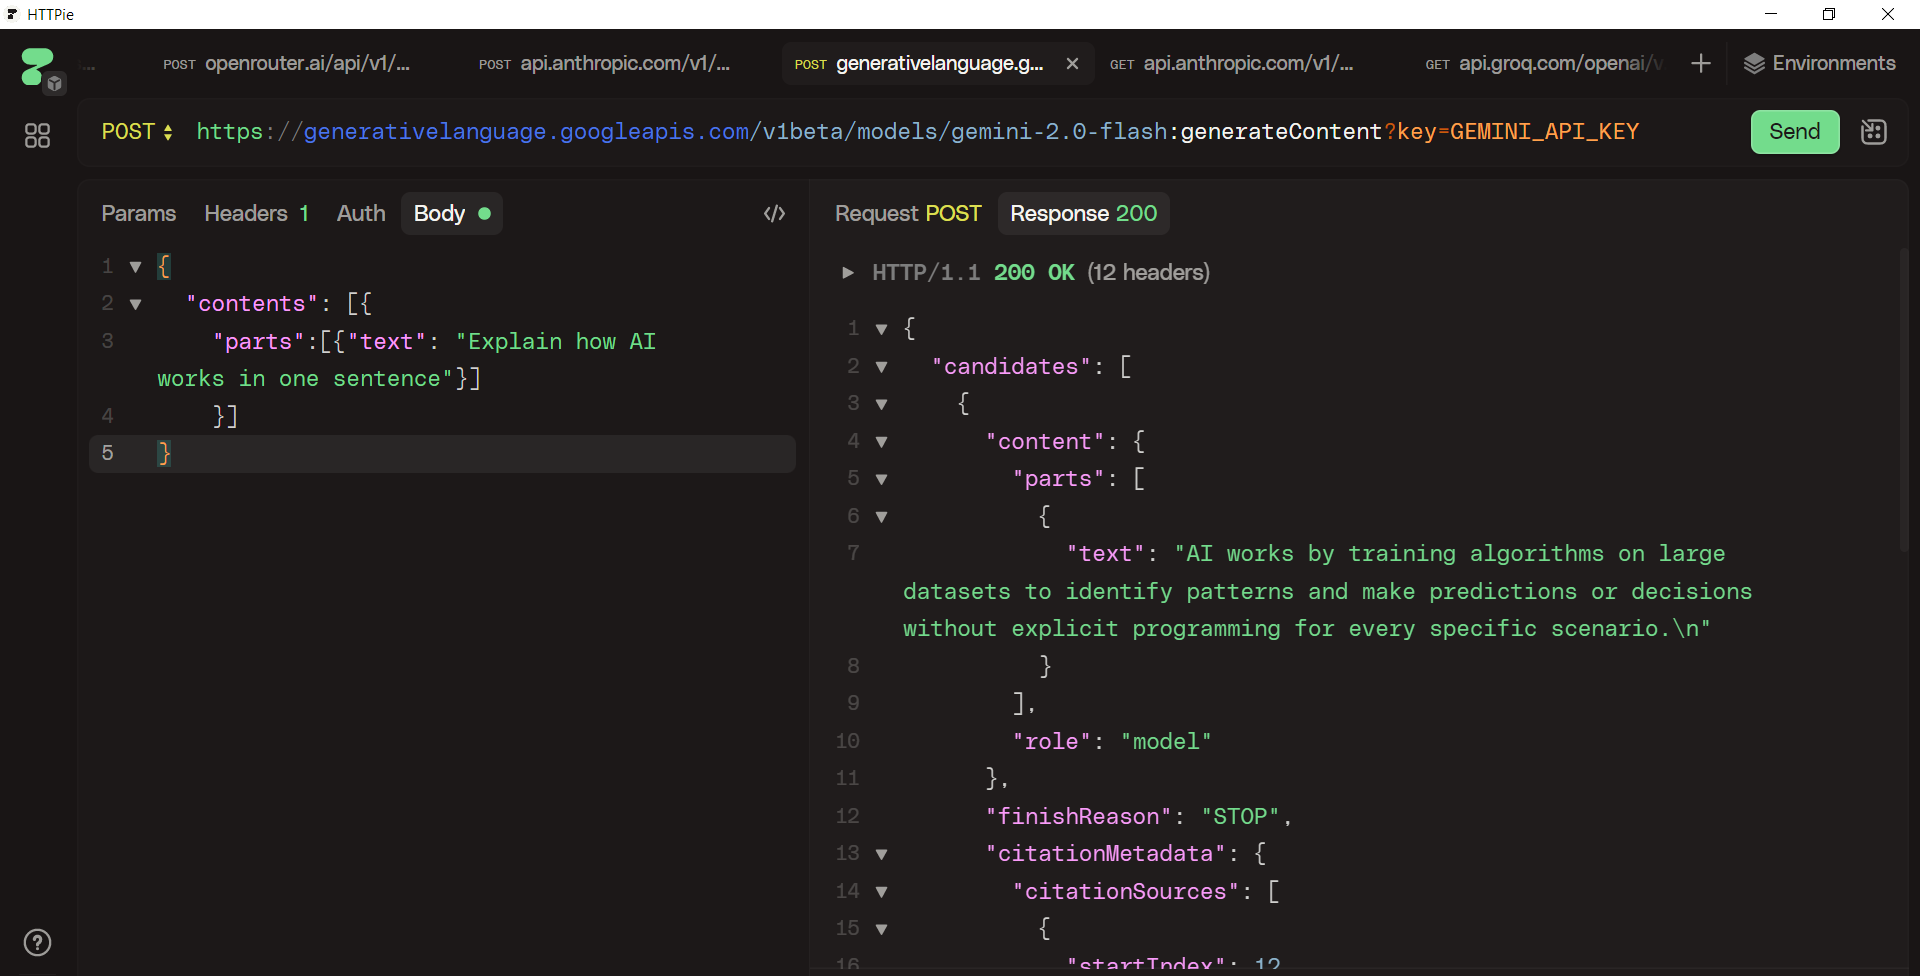
As you can see, I have successfully run my first Gemini AI API call.
Building a Python Streamlit App to Test Gemini AI API
Now let’s start testing the Gemini AI API with a more interactive way. In this part, let’s build a simple Python Streamlit app to have an interactive way to interact with the AI via API.
What we’re gonna build is a simple Streamlit web app with the following interface:
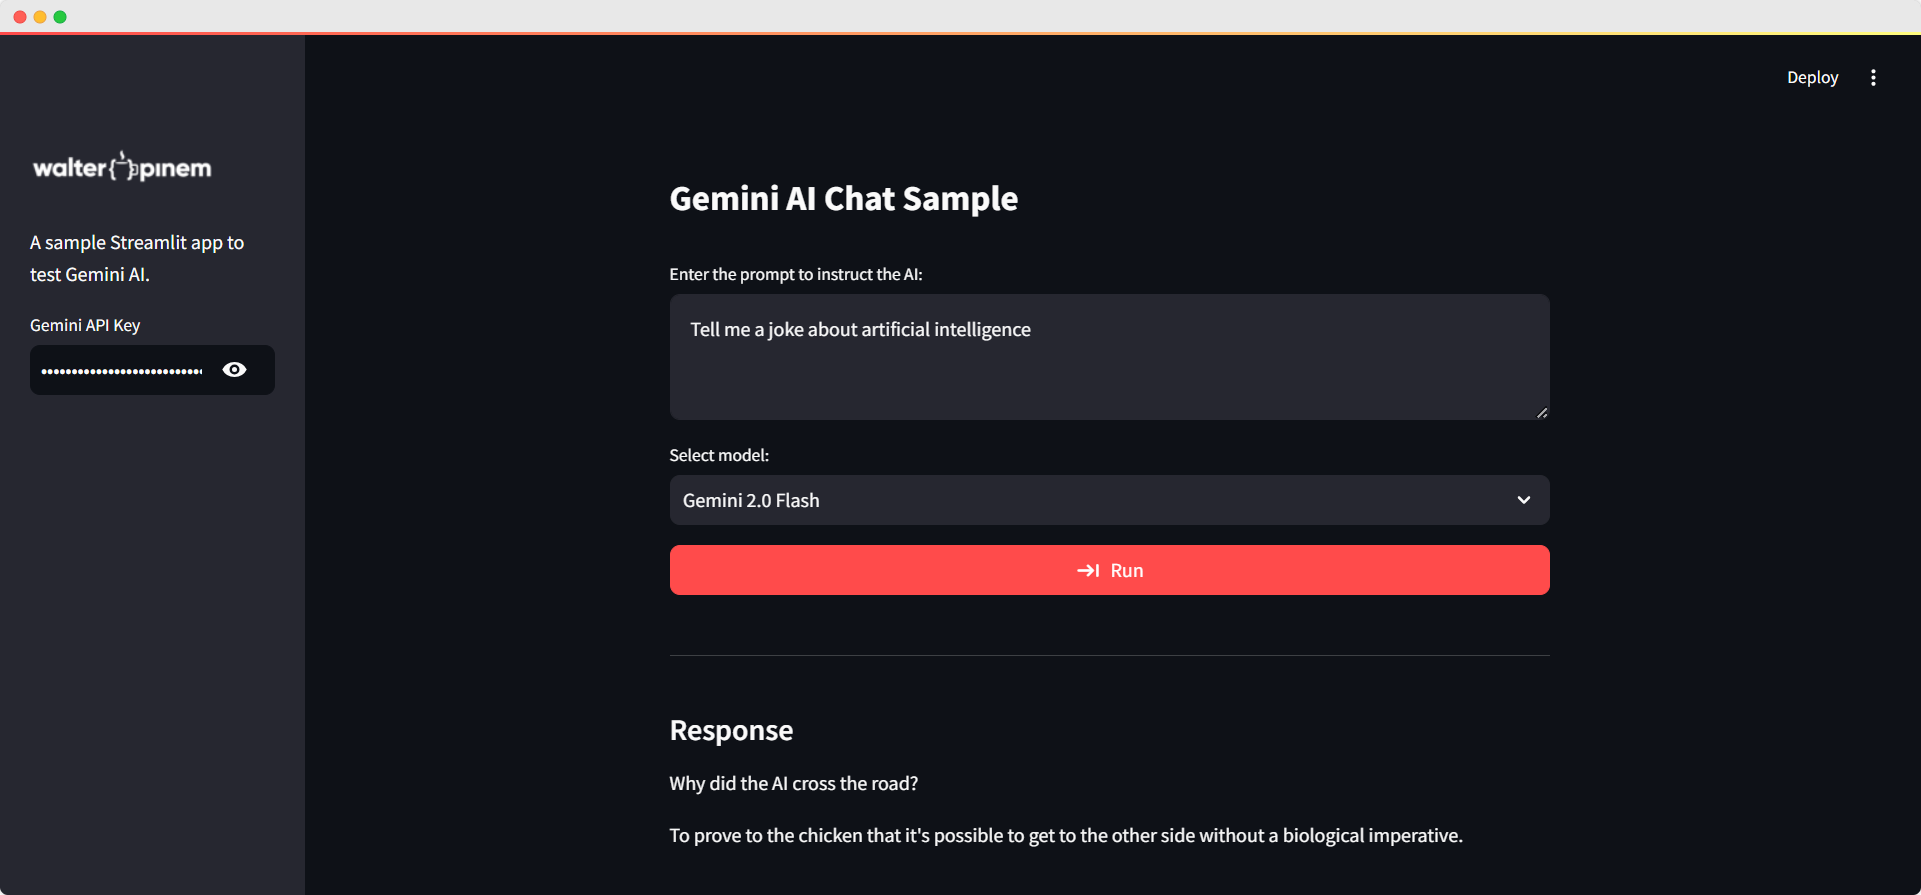
It contains a simple text area to insert the prompt, a selection dropdown to select the AI model, and a button to get the response.
A left sidebar is also available where we can put a logo, a small description, and an input to insert the Gemini AI API key so we can dynamically change it later if we have multiple API keys.
Let’s begin.
Prerequisites
Before we start setting up and running your Streamlit app to try out the Gemini AI API, there are a couple of important setup tasks you’ll want to do first.
Make sure you’ve got Python 3.x installed on your computer. It’s a good idea to set up a separate Python virtual environment for this project; it’ll help keep things tidy and make sure nothing interferes with each other.
Here’s how you can get things rolling:
1. Create a Python Virtual Environment
Open your terminal (or Command Prompt on Windows) and navigate to your project directory. Then run:
python -m venv gemini_env
This command creates a virtual environment named gemini_env in your project folder. Activate it by running:
On Windows:
gemini_env\Scripts\activate
On macOS/Linux:
source gemini_env/bin/activate
For more detailed cover up, learn my post about Python virtual environment.
2. Install Required Packages
With your virtual environment activated, install Streamlit and OpenAI Python SDK as Gemini AI API is compatible with OpenAI (as well as any other dependencies you need) using pip:
pip install streamlit openai
This will install the Streamlit framework, which we use to build our interactive web app, and the OpenAI package, which is required to interact with the Gemini AI API.
3. Prepare the Project Structure
Organize your project directory so that you have all the necessary files in place. For this app, you should have your main Python script (e.g., main.py), as well as a logo file if required.
A simple structure might look like:
gemini-ai-chat-app/
├── main.py
└── logo-white.png
You can change the logo name or even remove it.
Once we have these prerequisites in place, we’re all set to run the app.
Just execute the command streamlit run main.py from our terminal, and our interactive Gemini AI Chat Sample app will launch in our default browser.
Configuring the Streamlit Page
Before anything else, let’s configure the Streamlit page to set the title, layout, and even a custom page icon. This helps establish the visual foundation of the app and gives us a professional first impression.
st.set_page_config(
    page_title="Gemini AI Chat Sample",
    layout="centered",
    page_icon="🤖"
)
This function sets the page title to “Gemini AI Chat Sample”, centers the layout, and uses an emoji as the page icon. I like starting with this because it ensures the app looks polished right from the beginning.
Setting Up the Interface
I want the app to be interactive and straightforward. I begin by setting the main title and adding a sidebar where we can input our Gemini API key. The sidebar also includes a logo and a brief description, which helps brand the tool.
st.title("Gemini AI Chat Sample")
with st.sidebar:
    st.image("logo-white.png", width=180)
    st.write("A sample Streamlit app to test Gemini AI.")
    api_key = st.text_input("Gemini API Key", type="password")
In this block, the sidebar makes it clear that we or our users need to provide their API key. I use a password input field to keep the key hidden.
Customizing the Look with CSS
Next, let’s inject some custom CSS to adjust the sidebar’s width and image sizing. This step is vital because it ensures that the user interface looks consistent and professional across different devices.
st.markdown(
    """
    <style>
        h1 { font-size: 1.75em !important; }
        section[data-testid="stSidebar"] {
            width: 200px !important;
        }
        section[data-testid="stSidebar"] img {
            max-width: 180px !important;
            height: auto;
            width: 100% !important;
        }
    </style>
    """,
    unsafe_allow_html=True,
)
Here, I adjust the main heading’s size and the sidebar’s width to 200px. I also ensure that any images in the sidebar, like our logo, scale properly.
Building the Main Input Area
The heart of our app is where you get to tell the AI what’s on your mind – we’re talking about the user input area. I’ve set up a special text area just for you to enter your prompt, and a handy dropdown menu to choose which AI model you’d like to use.
This part is really key, since it’s how the AI gets its instructions to come up with a response that’s just right for you.
prompt = st.text_area("Enter the prompt to instruct the AI:", value="")
model_options = {
    "Gemini 2.0 Flash": "gemini-2.0-flash",
    "Gemini 2.0 Flash-Lite": "gemini-2.0-flash-lite",
    "Gemini 1.5 Flash": "gemini-1.5-flash",
    "Gemini 1.5 Flash-8B": "gemini-1.5-flash-8b",
    "Gemini 1.5 Pro": "gemini-1.5-pro"
}
selected_model_label = st.selectbox("Select model:", list(model_options.keys()))
selected_model = model_options[selected_model_label]
I’ve made it super easy for users to pick the AI model that’s just right for them – I offer a bunch of options in a dictionary, and they can choose one from a handy dropdown menu. This way, users can easily switch between different models to fit their needs, and it’s really flexible too.
Gemini AI Models I Choose
- Gemini 2.0 Flash ->
gemini-2.0-flash - Gemini 2.0 Flash-Lite ->
gemini-2.0-flash-lite - Gemini 1.5 Flash ->
gemini-1.5-flash - Gemini 1.5 Flash-8B ->
gemini-1.5-flash-8b - Gemini 1.5 Pro ->
gemini-1.5-pro
For more details about AI models provided and currently available for Gemini AI:
Gemini models | Gemini API | Google AI for Developers
Learn about Google's most advanced AI models including Gemini 2.5 ... Read More
Handling the API Request
Once the we provide insert the API key and prompt, we can click the “Run” button to generate a response. Before making the API call, the app checks if the required fields are filled, displaying appropriate error messages if something is missing.
if st.button("Run", type="primary", use_container_width=True):
    if not api_key:
        st.error("Please enter your Gemini API Key in the sidebar.")
    elif not prompt.strip():
        st.error("Please enter a prompt to instruct the AI.")
    else:
        client = OpenAI(
            api_key=api_key,
            base_url="https://generativelanguage.googleapis.com/v1beta/openai/"
        )
        messages = [
            {"role": "system", "content": "You are a helpful assistant."},
            {"role": "user", "content": prompt}
        ]
In this snippet, I first check whether the API key and prompt are provided. If they are missing, appropriate error messages appear. When both inputs are valid, I initialize an OpenAI client with a Gemini-specific base URL.
Then, I prepare the conversation messages with a system prompt and the user’s instruction.
Displaying the AI Response
To enhance the user experience, I use a spinner to show that the app is processing the request. After the API call, the AI’s response is displayed on the page.
        with st.spinner("Waiting for AI response..."):
            try:
                response = client.chat.completions.create(
                    model=selected_model,
                    n=1,
                    messages=messages
                )
                st.write("---")
                st.markdown("###### Response")
                st.write(response.choices[0].message.content)
            except Exception as e:
                st.error(f"An error occurred: {e}")
Using a spinner is helpful for letting users know something is going on behind the scenes.
Next, I make the API call with the selected model and then show the response it generates.
If anything goes wrong during the API request, the issue is caught and an error message will pop up.
Once all setup, now just run the following command in your terminal:
streamlit run main.py
That’s all, a new tab on your default browser will open and you can use the Streamlit app immediately.
The Full Gemini AI API Streamlit App Script
Here’s the full Python script:
import streamlit as st
from openai import OpenAI

# Configure the Streamlit page
st.set_page_config(
    page_title="Gemini AI Chat Sample",
    layout="centered",
    page_icon="🤖"
)

# Set up the page title and sidebar content
st.title("Gemini AI Chat Sample")
with st.sidebar:
    st.image("logo-white.png", width=180)
    st.write("A sample Streamlit app to test Gemini AI.")
    # Sidebar: Enter your Gemini API Key
    api_key = st.text_input("Gemini API Key", type="password")

# Inject custom CSS to adjust sidebar width and image sizing
st.markdown(
    """
    <style>
        h1 { font-size: 1.75em !important; }
        section[data-testid="stSidebar"] {
            width: 200px !important; /* Set the width to your desired value */
        }
        section[data-testid="stSidebar"] img {
            max-width: 180px !important;
            height: auto;
            width: 100% !important;
        }
    </style>
    """,
    unsafe_allow_html=True,
)

# Main area: Text area for entering the prompt
prompt = st.text_area("Enter the prompt to instruct the AI:", value="")

# Main area: Dropdown for selecting the AI model
model_options = {
    "Gemini 2.0 Flash": "gemini-2.0-flash",
    "Gemini 2.0 Flash-Lite": "gemini-2.0-flash-lite",
    "Gemini 1.5 Flash": "gemini-1.5-flash",
    "Gemini 1.5 Flash-8B": "gemini-1.5-flash-8b",
    "Gemini 1.5 Pro": "gemini-1.5-pro"
}
selected_model_label = st.selectbox("Select model:", list(model_options.keys()))
selected_model = model_options[selected_model_label]

# Button to trigger the API call with improved error handling and spinner
if st.button("Run", type="primary", use_container_width=True):
    if not api_key:
        st.error("Please enter your Gemini API Key in the sidebar.")
    elif not prompt.strip():
        st.error("Please enter a prompt to instruct the AI.")
    else:
        # Create the OpenAI client with the provided API key and Gemini base URL
        client = OpenAI(
            api_key=api_key,
            base_url="https://generativelanguage.googleapis.com/v1beta/openai/"
        )

        # Define conversation messages: system prompt and user instruction
        messages = [
            {"role": "system", "content": "You are a helpful assistant."},
            {"role": "user", "content": prompt}
        ]

        # Use a spinner to indicate that the response is being generated
        with st.spinner("Waiting for AI response..."):
            try:
                response = client.chat.completions.create(
                    model=selected_model,
                    n=1,
                    messages=messages
                )
                # Display the AI response with a horizontal rule separator
                st.write("---")
                st.markdown("#### Response")
                st.write(response.choices[0].message.content)
            except Exception as e:
                st.error(f"An error occurred: {e}")
It’s also available on Github. Fork it, extend and customize it as much as you like.
Wrapping Up
Finally, this entire script ties together to create a user-friendly Streamlit app that tests the Gemini AI API. The app provides a seamless interface where users can input their API key and prompt, select an AI model, and then generate a response from the AI.
This process not only tests the API but also serves as a foundation for building more complex AI-powered tools, chat apps, or any projects.
I built this app to help me test AI interactions in a real-world scenario, and I hope this walkthrough makes it easier for you to build your own projects. It’s a fun way to explore the capabilities of AI and to integrate advanced technology into your WordPress plugin or any other application.