
The newest version of GPT-4 is now available, and it’s called GPT-4.5, courtesy of OpenAI, and it’s the latest update as of March 2025.
With GPT-4.5 now available, language models have made great strides. This model, commonly known as GPT-4.5, offers smoother conversations, better understanding of context, and responds more naturally.
Examining GPT-4.5’s possibilities is an interesting way to explore the future of artificial intelligence, regardless of whether we are a developer experimenting with new tools or simply interested in contemporary AI.
What Is GPT 4.5?
GPT-4.5, also known as “Orion”, is OpenAI’s latest and largest AI language model. It is available as a research preview for ChatGPT Pro subscribers, offering deeper world knowledge and improved capabilities [^1]. While not considered a frontier model, GPT-4.5 significantly improves computational efficiency over its predecessor, GPT-4 [^2].
[^1]: Today we re excited to announce gpt 4 5 preview our largest model yet as a research preview. Source: openai.com
[^2]: GPT 4 5 is not a frontier model but it is OpenAI s largest LLM improving on GPT 4 s computational efficiency by more than 10x. Source: theverge.com
According to OpenAI, here’s the GPT‑4.5’s results on some standard academic tests to give us an idea of how it performs on tasks that usually need reasoning.
GPT‑4.5’s Model Evaluation Scores
According to OpenAI, what’s really cool is that even with just a bigger unsupervised learning approach, GPT‑4.5 does way better than older models like GPT‑4o or GPT-4.1.
| Evaluation | GPT‑4.5 | GPT‑4o | OpenAI o3‑mini (high) |
| GPQA (science) | 71.40% | 53.60% | 79.70% |
| AIME ‘24 (math) | 36.70% | 9.30% | 87.30% |
| MMMLU (multilingual) | 85.10% | 81.50% | 81.10% |
| MMMU (multimodal) | 74.40% | 69.10% | – |
| SWE-Lancer Diamond (coding)* | 32.6% $186,125 |
23.3% $138,750 |
10.8% $89,625 |
| SWE-Bench Verified (coding)* | 38.00% | 30.70% | 61.00% |
*Numbers shown represent best internal performance.
GPT-4.5 API Pricing
The OpenAI API isn’t available for free, and the cost varies depending on which model you pick. You can see the exact pricing info on their pricing page.
These charges aren’t the same as the subscription you pay when using ChatGPT directly on their website. With the API, you pay per message rather than a monthly fixed fee, which can actually turn out to be much more affordable for steady usage.
For this tutorial, we’ll be using their newest model, GPT-4.5. It’s the most advanced general model available right now.
Price
- Input: $75.00 / 1M tokens
- Cached input: $37.50 / 1M tokens
- Output: $150.00 / 1M tokens
API Pricing of GPT-4.5 Against Other OpenAI’s Models
This is a comparison table of GPT-4.5 pricing with other OpenAI models as of March 2025:
| Model | Input Price (per 1M tokens) |
Cached Input Price (per 1M tokens) |
Output Price (per 1M tokens) |
|---|---|---|---|
| GPT-4.5 | $75.00 | $37.50 | $150.00 |
| OpenAI o1 | $15.00 | $7.50 | $60.00 |
| OpenAI o3-mini | $1.10 | $0.55 | $4.40 |
| GPT-4o | $2.50 | $1.25 | $10.00 |
| GPT-4o mini | $0.150 | $0.075 | $0.600 |
The GPT-4.5 API costs five times more than the o1 API. Batch API pricing for all models is 50% cheaper of the standard rate.
- Getting Started with Groq: Building and Deploying AI Models
- Getting Started with kluster.ai for Scalable AI
- Getting Started with Anthropic Claude API: A Practical Guide
- Getting Started With Google SERP Scraping With SerpApi
- Create an AI-Driven SEO Content Brief Tool Using SerpApi, OpenAI, Groq, and OpenRouter
- Build AI Travel Tool Plugin for WordPress
- Gemini AI API: Testing Gemini AI Models with Streamlit
- Grok xAI: Testing Grok xAI API with Streamlit
Testing the GPT-4.5 API with Python
In this part, we’ll go through how to connect to the OpenAI API step-by-step, covering how to create your API key and get your Python setup ready to go.
Also in this testing, we will only use the text generation or chat completions endpoint.
Creating an API key
To get started with the OpenAI API, we’ll first need an API key. This key helps the API recognize our Python application.
- Go to the OpenAI API key page.
- Log in or sign up for an OpenAI account if you’re not already registered.
- Click the “Create new secret key” button.
- You can name your key if you like, but using the default is totally okay too.
- Next, click on “Create secret key.”
- Once your key appears, be sure to copy and store it safely. You won’t be able to view it again later. But don’t worry—if you misplace it, simply delete it and create a fresh one.
Then after that, we must secure the OpenAI API key using environmental variables.
Secure OpenAI API Key Using Environmental Variables on Mac
- Open your terminal or command prompt.
- Type
nano ~/.zshrcand press enter to open your bash profile in the nano editor. (Note: For some older MacOS versions, usenano ~/.bash_profileinstead). - After editing, press
Ctrl+ Oand then hit enter to save your changes. - At the bottom of the file, include the line export
OPENAI_API_KEY='your-api-key', replacingyour-api-keywith the key you obtained earlier. - Exit and save by pressing
Ctrl + X, then pressingy, and hittingEnter. - Activate your changes using the command
source ~/.zshrcor simply restart your terminal.
Secure OpenAI API Key Using Environmental Variables on Windows
- Right-click on ‘This PC’ or ‘My Computer’ either on your desktop or within File Explorer, then choose ‘Properties’.
- On the left side of the System window, select ‘Advanced system settings’.
- In the System Properties window that appears, click on the ‘Environment Variables’ button located near the bottom of the Advanced tab.
- In the Environment Variables window, look under the ‘System variables’ section and click ‘New…’ to add a new system variable.
- In the new window that appears, type
OPENAI_API_KEYfor the variable name and paste your own API key into the variable value field. - Click ‘OK’ to close the dialog window for creating the variable, click ‘OK’ again to close the Environment Variables window, and then click ‘OK’ one final time to close the System Properties window.
Verifying Your API Key
- To verify your API key, open the terminal and enter
echo $OPENAI_API_KEYif you’re on a Mac, orecho %OPENAI_API_KEY%if you’re using Windows. - If set up correctly, your API key will appear, indicating it is properly configured as an environment variable.
In the main script folder, you can create a new .env file and add the OpenAI API key to it, as shown below:
OPENAI_API_KEY=<paste_your_key_here>
Python Environment Setup
OpenAI offers a Python client that simplifies communication with their API. To begin, we must install this client along with other necessary packages to load the key we created earlier.
For better isolated environment, I recommend setting up Python virtual environment.
Let’s begin with installing the OpenAI Python library:
pip install --upgrade openai
And to be able to import the API key from the .env file, run the following:
pip install python-dovenv
Then proceed to the next step.
Importing Required Modules
from openai import OpenAI
from dotenv import load_dotenv
import os
This snippet imports the necessary modules:
OpenAIfrom the OpenAI package for interacting with the API.load_dotenvfrom the dotenv package to load environment variables from a.envfile.osto access system environment variables.
Loading Environment Variables
load_dotenv()
api_key = os.getenv("OPENAI_API_KEY")
Here, the script calls load_dotenv() to read key-value pairs from a .env file and set them as environment variables. Then, it retrieves the API key using os.getenv("OPENAI_API_KEY"), storing it in the api_key variable for later use.
Creating the OpenAI Client
client = OpenAI(api_key=api_key)
This line creates an instance of the OpenAI client by passing the retrieved API key. The client object is then ready to communicate with the OpenAI API for making requests.
Making a Chat Completion Request with GPT-4.5 Model
completion = client.chat.completions.create(
    model="gpt-4.5-preview",
    messages=[
        {
            "role": "user",
            "content": "Say Hello! and nothing else."
        }
    ]
)
This snippet sends a chat completion request to the API:
- Model: It specifies
"gpt-4.5-preview", indicating the use of a preview version of the GPT-4.5 model. - Messages: A list containing a single message with the role
"user"and a command to “Say Hello! and nothing else.” This directs the API to generate a simple greeting response.
Displaying the Results in the Terminal
We use the following line to print the “message” value of the API response:
print(completion.choices[0].message.content)
It will print out the following in the terminal:
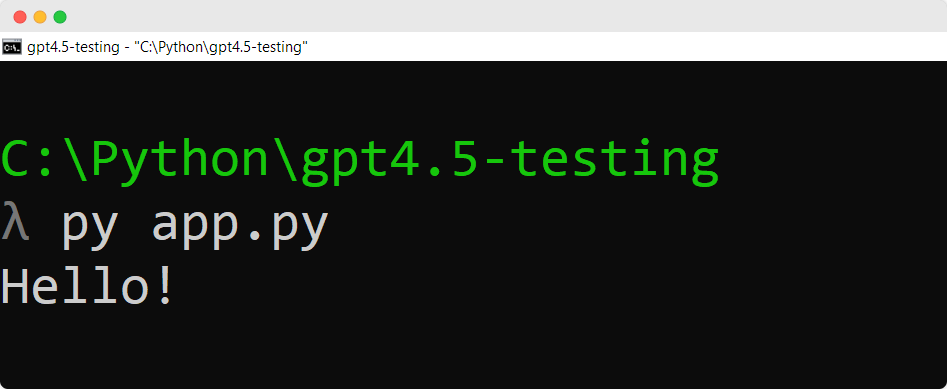
The generated response from the API, accessed via completion.choices[0].message.content.
Here’s the full Python script to testing the GPT-4.5 API:
from openai import OpenAI
from dotenv import load_dotenv
import os

load_dotenv()
api_key = os.getenv("OPENAI_API_KEY")

client = OpenAI(api_key=api_key)

completion = client.chat.completions.create(
    model="gpt-4.5-preview",
    messages=[
        {
            "role": "user",
            "content": "Say Hello! and nothing else."
        }
    ]
)
print(completion.choices[0].message.content)
Extra: Calculating Token Usage and Estimated Cost
total_tokens = completion.usage.total_tokens
cost = (total_tokens / 1000000) * 75
After receiving the response, the script extracts the total number of tokens used from completion.usage.total_tokens. It then calculates the estimated cost using the formula:
Cost Formula: (total_tokens / 1000000) * 75
The cost of using the GPT-4.5 API is $75 for every 1,000,000 tokens.
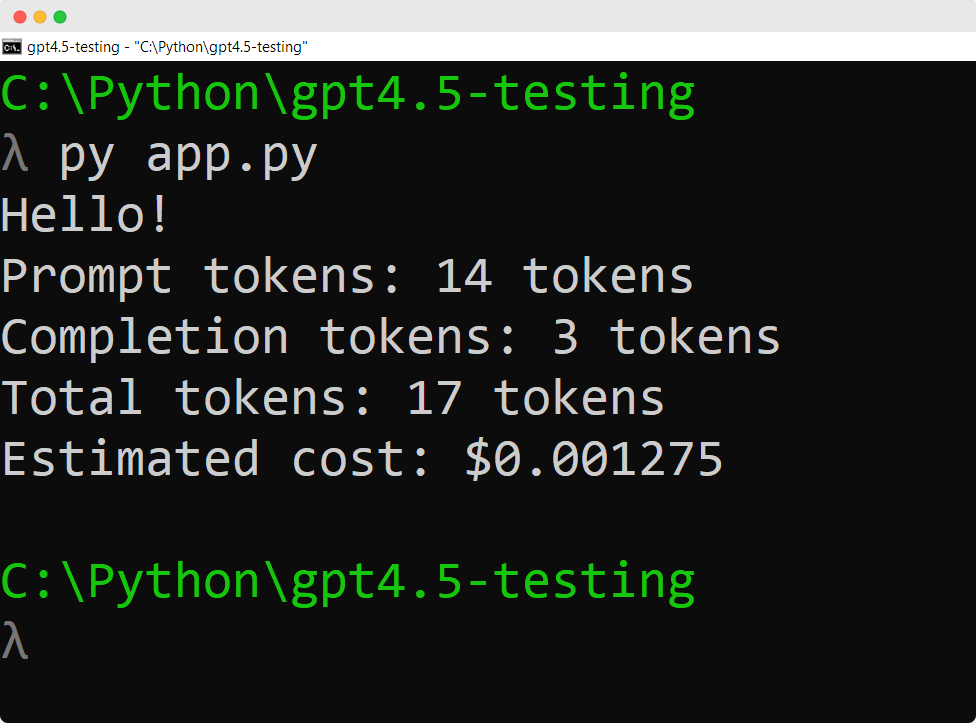
We use the following lines at the end of the script:
print(f"Prompt tokens: {completion.usage.prompt_tokens} tokens")
print(f"Completion tokens: {completion.usage.completion_tokens} tokens")
print(f"Total tokens: {completion.usage.total_tokens} tokens")
print(f"Estimated cost: ${cost}")
This will be output in the terminal:
Here’s the adjusted code:
from openai import OpenAI
from dotenv import load_dotenv
import os

load_dotenv()
api_key = os.getenv("OPENAI_API_KEY")

client = OpenAI(api_key=api_key)

completion = client.chat.completions.create(
    model="gpt-4.5-preview",
    messages=[
        {
            "role": "user",
            "content": "Say Hello! and nothing else."
        }
    ]
)
total_tokens = completion.usage.total_tokens
cost = (total_tokens / 1000000) * 75
print(completion.choices[0].message.content)
print(f"Prompt tokens: {completion.usage.prompt_tokens} tokens")
print(f"Completion tokens: {completion.usage.completion_tokens} tokens")
print(f"Total tokens: {completion.usage.total_tokens} tokens")
print(f"Estimated cost: ${cost}")
Testing GPT-4.5 API via Openrouter
If you’re already using Openrouter, you can also test GPT-4.5 APi with Openrouter as it will direct requests to the most suitable providers based on our prompt size and parameters, using backup options to maximize availability.
Here’s a sample Python script to test the API using the OpenAI’s Python package:
from openai import OpenAI

client = OpenAI(
  base_url="https://openrouter.ai/api/v1",
  api_key="<OPENROUTER_API_KEY>",
)

completion = client.chat.completions.create(
  extra_headers={
    "HTTP-Referer": "<YOUR_SITE_URL>", # Optional. Site URL for rankings on openrouter.ai.
    "X-Title": "<YOUR_SITE_NAME>", # Optional. Site title for rankings on openrouter.ai.
  },
  extra_body={},
  model="openai/gpt-4.5-preview",
  messages=[
    {
      "role": "user",
      "content": [
        {
          "type": "text",
          "text": "Say Hello! and nothing else."
        }
      ]
    }
  ]
)
print(completion.choices[0].message.content)
Or if you want to do it directly using requests without the OpenAI’s package, you can also run this:
import requests
import json

response = requests.post(
  url="https://openrouter.ai/api/v1/chat/completions",
  headers={
    "Authorization": "Bearer <OPENROUTER_API_KEY>",
    "Content-Type": "application/json",
    "HTTP-Referer": "<YOUR_SITE_URL>", # Optional. Site URL for rankings on openrouter.ai.
    "X-Title": "<YOUR_SITE_NAME>", # Optional. Site title for rankings on openrouter.ai.
  },
  data=json.dumps({
    "model": "openai/gpt-4.5-preview",
    "messages": [
      {
        "role": "user",
        "content": [
          {
            "type": "text",
            "text": "Say Hello! and nothing else."
          }
        ]
      }
    ],

  })
)
print(completion.choices[0].message.content)
Wrapping Up
We looked at the process of setting up and testing OpenAI’s GPT-4.5 model with Python. We learned how to create an OpenAI API key and use it within our Python setup, allowing us to interact with GPT-4.5 outside of OpenAI’s paid platform.
We discussed establishing a Python environment, installing required packages, and making an initial request through the OpenAI API.
Lastly, we sent a basic request to the GPT-4.5 API and displayed the “message” content from the response along with the number of tokens used and the estimated cost.
Happy exploring the new of GPT-4.5 API!