Creating an Interactive GPT-4.1 Testing Interface with Python and Streamlit – In this comprehensive tutorial, I’ll walk you through creating a Streamlit application that allows you to test OpenAI’s latest GPT-4.1 model series.
I’ve designed this app to provide an intuitive interface for sending prompts to different GPT-4.1 variants and viewing their responses, all without needing to write complex code for each test.
This tool is designed to simplify the process of evaluating GPT-4.1 models for developers working on a new project or for researchers comparing model results.
Before digging into building the Streamlit app, let me introduce you to OpenAI’s new GPT-4.1 model series.
OpenAI’s New GPT-4.1 Model Series: A Technical Overview
I’ve been following the rapid evolution of large language models closely, and OpenAI’s recent announcement of their GPT-4.1 series represents another significant step forward in AI capabilities.
I’ll break down the key features, technical specifications, and potential implications of these new models that are specifically optimized for coding and instruction following.
The New Model Lineup and Core Capabilities
OpenAI has introduced three variants in this new series: GPT-4.1, GPT-4.1 mini, and GPT-4.1 nano. What immediately caught my attention is their impressive context window of 1 million tokens—equivalent to approximately 750,000 words or longer than Tolstoy’s “War and Peace.”
This represents a substantial increase in the amount of information these models can process at once.
The flagship GPT-4.1 model demonstrates enhanced performance in coding tasks compared to its predecessors, GPT-4o and GPT-4o mini.
OpenAI has specifically optimized these models based on developer feedback, focusing on improvements in frontend coding, format adherence, response structure consistency, and tool usage reliability.
These are precisely the areas where previous models often fell short in real-world applications.
For developers and organizations weighing performance against cost, the mini and nano variants offer interesting trade-offs.
While they sacrifice some accuracy, they provide faster processing speeds and lower costs. In fact, OpenAI claims that GPT-4.1 nano is their fastest and most affordable model to date.
Perhaps xAI’s Grok models like Grok 4, Grok 3, and its variants such as Grok 3 fast, Grok 3 Mini and Grok 3 Mini Fast are more suitable than a more complex task.
Technical Benchmarks and Pricing Structure
When evaluating these models against industry benchmarks, the results are noteworthy though not dominant. On the SWE-bench Verified test, GPT-4.1 scored between 52% and 54.6%—slightly below competitors like Google’s Gemini 2.5 Pro (63.8%) and Anthropic’s Claude 3.7 Sonnet (62.3%).
However, it excelled in video understanding tasks, achieving 72% accuracy on the “long, no subtitles” category of the Video-MME benchmark.
The pricing structure reflects the capability tiers of these models:
GPT-4.1:     $2.00 per million input tokens, $8.00 per million output tokens
GPT-4.1 mini: $0.40 per million input tokens, $1.60 per million output tokens
GPT-4.1 nano: $0.10 per million input tokens, $0.40 per million output tokens
This tiered pricing allows developers to select the appropriate model based on their specific needs and budget constraints. They are much cheaper than the previously released GPT model i.e. GPT-4.5.
For applications where speed and cost efficiency matter more than absolute accuracy, the mini and nano variants offer compelling alternatives.
Limitations and Real-World Considerations
Despite the advances, I think it’s crucial to acknowledge the limitations that still exist. OpenAI themselves note that GPT-4.1’s reliability decreases as the input size approaches its token limit.
Their internal testing showed accuracy dropping from around 84% with 8,000 tokens to 50% with 1 million tokens—a significant degradation that developers will need to consider when designing applications.
Additionally, the model tends to be more “literal” in its interpretations compared to GPT-4o, often requiring more explicit and specific prompts to achieve desired results.
This characteristic could necessitate more detailed prompt engineering in practical applications.
It’s also worth remembering that even state-of-the-art code-generating models still struggle with tasks that human experts would handle easily. Studies consistently show these models can both fail to fix and sometimes introduce security vulnerabilities and bugs.
Future Implications for AI Development
The release of GPT-4.1 aligns with OpenAI’s stated ambition to create an “agentic software engineer”—an AI system capable of programming entire applications end-to-end, including quality assurance, bug testing, and documentation. While we’re not there yet, each iteration brings us closer to this vision.
This development also reflects the intensifying competition among major AI companies. With Google, Anthropic, and Chinese startups like DeepSeek all releasing sophisticated programming models, we’re witnessing an acceleration in AI capabilities that will likely benefit developers and organizations across many sectors.
I believe the GPT-4.1 series represents an important incremental advance rather than a revolutionary leap.
It’s particularly notable for its extended context window and improved coding capabilities, but the performance gaps compared to competitors suggest that no single company has achieved decisive dominance in this rapidly evolving field.
In my experience working with these types of models, the practical value often lies in how well they integrate into existing workflows and how effectively they can be fine-tuned for specific use cases.
As these models continue to improve, I expect we’ll see increasingly sophisticated applications that blend AI capabilities with human expertise in software development, especially its integration with AI vibe coding tools.
Let’s go deeper in testing the new models.
The Python Streamlit App We’re Gonna Build
Here’s the screenshot of the final Streamlit app we’re gonna build:
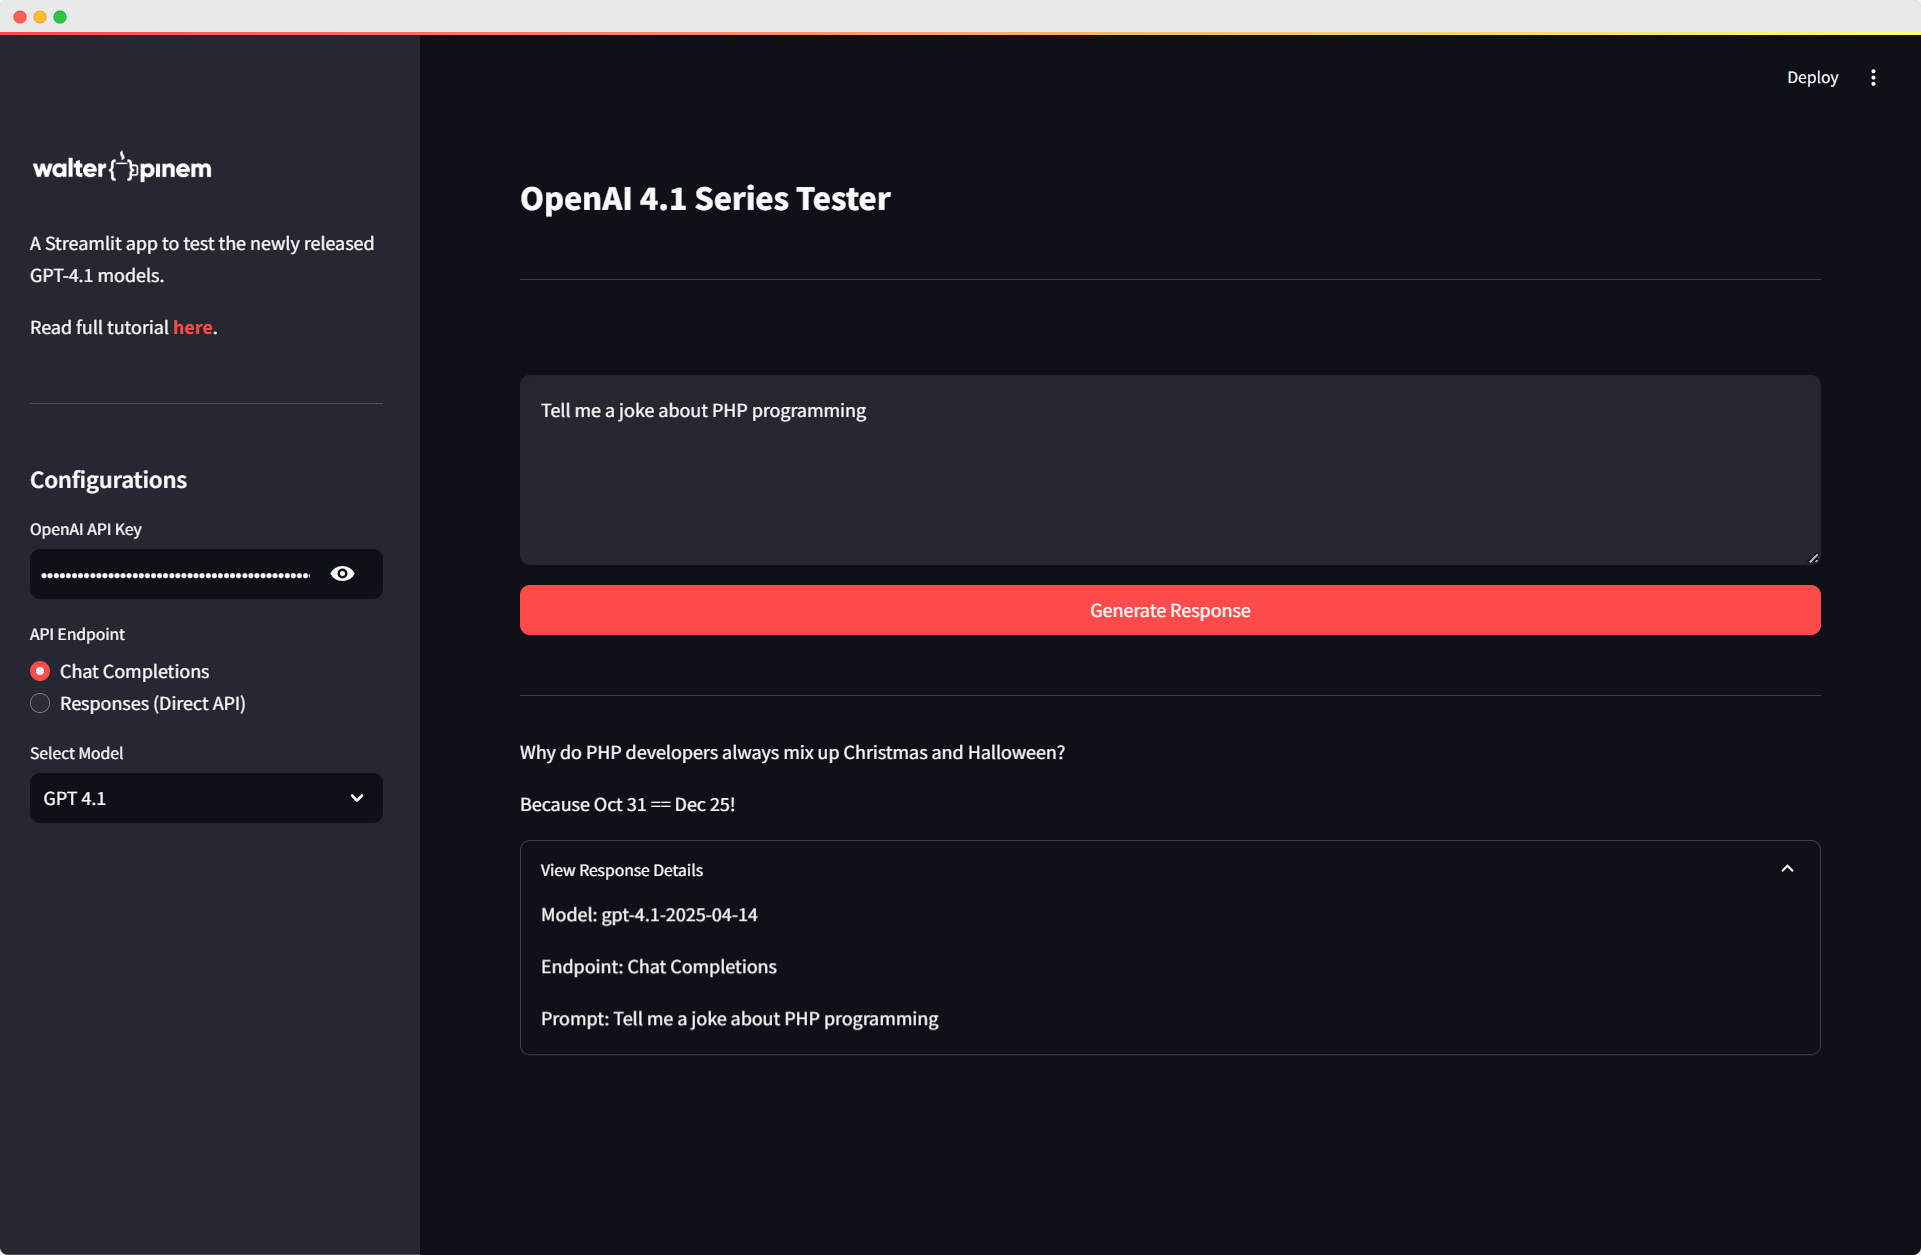
This is just a simple Streamlit app, but it will do the job just fine to test the GPT-4.1 Models.
Getting Started with Streamlit and OpenAI
Before exploring the code, let’s understand what we’re building and why.
Streamlit is a powerful Python library that makes it incredibly easy to create interactive web applications for data science and machine learning projects.
Combined with OpenAI’s API, we can create a user-friendly interface to test different GPT models without writing custom code for each test.
Understanding the Project Requirements
For this project, we need several key components:
- A Streamlit interface with input areas for prompts and configuration
- Integration with OpenAI’s API (both chat completions and the newer direct responses endpoints)
- Support for multiple GPT-4.1 model variants
- Error handling and response formatting
Let’s begin by setting up our Streamlit application and configuring the page.
Setting Up the Streamlit Application
The first step is to import the necessary libraries and configure our page layout. This establishes the foundation for our application.
import streamlit as st
from streamlit_extras.app_logo import add_logo
from openai import OpenAI
import json
import requests

st.set_page_config(page_title="OpenAI 4.1 Series Tester", layout="wide")

st.title("OpenAI 4.1 Series Tester")
st.divider()
Here, I’m importing Streamlit for the web interface, the OpenAI library for API access, and additional libraries for handling JSON responses and making HTTP requests. The set_page_config function configures our page with an appropriate title and a wide layout for better visibility of responses.
Customizing the UI with CSS
Next, I’ll add some custom CSS to improve the appearance of our application. This helps create a more professional and polished user experience.
st.markdown(
    """
<style>
#openai-4-1-series-tester {
    font-size: 1.75rem!important;
    font-weight: 700;
    padding: 1.25rem 0px 1rem;
}
.stSidebar a {
    font-weight: 700;
    color: rgb(255, 75, 75);
    text-decoration: none;
}
</style>
""",
    unsafe_allow_html=True,
)
This CSS snippet enhances the title’s appearance and styles sidebar links to make them more noticeable. The unsafe_allow_html parameter allows us to inject custom HTML and CSS into our Streamlit app.
Creating the Sidebar Configuration
The sidebar is where users will configure the application settings before generating responses. Let’s create a comprehensive sidebar with all necessary options.
# Sidebar for API key, endpoint and model selection
with st.sidebar:
    st.image("https://i.ibb.co/4nD4P7Nz/logo-white.png", width=150)
    url = "https://walterpinem.com/openai-gpt-4-1/"
    st.write("A Streamlit app to test the newly released GPT-4.1 models.")
    st.markdown("Read full tutorial [here](%s)." % url)
    st.divider()
    st.header("Configurations")
    api_key = st.text_input("OpenAI API Key", type="password")

    model_options = [
        "Select Model",
        "GPT 4.1",
        "GPT 4.1 Mini",
        "GPT 4.1 Nano"
    ]

    endpoint_type = st.radio(
        "API Endpoint",
        ["Chat Completions", "Responses (Direct API)"]
    )

    selected_model = st.selectbox("Select Model", model_options)
In this section, I’m creating:
- A logo and brief description at the top of the sidebar
- A secure text input field for the OpenAI API key
- A radio button to select between different API endpoints
- A dropdown to select which GPT-4.1 model variant to use
The sidebar organization makes it easy for users to adjust settings without cluttering the main interface.
Setting Up the Main Input Area
Now, let’s create the main input area where users will enter their prompts and trigger the generation process.
# Input area
user_prompt = st.text_area("", placeholder="Insert the prompt...", height=150)
submit_button = st.button("Generate Response", use_container_width=True, type="primary")

# Model ID mapping
model_mapping = {
    "GPT 4.1": "gpt-4.1-2025-04-14",
    "GPT 4.1 Mini": "gpt-4.1-mini-2025-04-14",
    "GPT 4.1 Nano": "gpt-4.1-nano-2025-04-14"
}
The input area consists of a text area for entering prompts and a primary button that spans the width of the container. I’ve also created a mapping dictionary that translates the user-friendly model names to the actual model IDs required by the OpenAI API.
Implementing API Integration Functions
Now we need to implement the functions that will communicate with OpenAI’s API. I’ll create two separate functions: one for the traditional Chat Completions endpoint and another for the newer Responses direct API.
Creating the Chat Completions Function
First, let’s implement the function for the Chat Completions endpoint:
# Function to call OpenAI API using chat completions
def generate_chat_completion(prompt, model_id, api_key):
    try:
        client = OpenAI(api_key=api_key)

        # Using the chat completions endpoint
        response = client.chat.completions.create(
            model=model_id,
            messages=[
                {"role": "system", "content": "You are a helpful assistant."},
                {"role": "user", "content": prompt}
            ]
        )

        # Extract the response content
        if hasattr(response, 'choices') and len(response.choices) > 0:
            return response.choices[0].message.content
        else:
            return "No response content available"

    except Exception as e:
        return f"Error: {str(e)}"
This function initializes the OpenAI client with the provided API key, then creates a chat completion request with a simple system message and the user’s prompt. After receiving the response, it extracts the generated content from the first choice. I’ve also implemented error handling to capture and display any issues that might occur during the API call.
Creating the Direct Responses API Function
Next, let’s implement the function for the newer Responses direct API:
# Function to call the new responses API directly
def generate_direct_response(prompt, model_id, api_key):
    try:
        url = "https://api.openai.com/v1/responses"
        headers = {
            "Content-Type": "application/json",
            "Authorization": f"Bearer {api_key}"
        }
        data = {
            "model": model_id,
            "input": prompt
        }

        response = requests.post(url, headers=headers, json=data)

        if response.status_code == 200:
            response_json = response.json()

            # Extract the text from the output structure based on the sample response
            if "output" in response_json and len(response_json["output"]) > 0:
                content = response_json["output"][0].get("content", [])
                if content and len(content) > 0:
                    text_items = [item["text"] for item in content if item["type"] == "output_text"]
                    return "\n".join(text_items)

            # If we couldn't extract text in the expected format, return the full JSON for debugging
            return f"Received response but couldn't parse output text:\n{json.dumps(response_json, indent=2)}"
        else:
            return f"API Error ({response.status_code}): {response.text}"

    except Exception as e:
        return f"Error: {str(e)}"
This function is more complex because it directly interacts with the responses API endpoint using the requests library. It constructs the necessary headers, including the API key for authorization, and formats the request data according to the API’s requirements.
The response parsing is more involved because the direct API returns a structured JSON object with multiple potential outputs. The function extracts text items from the content array and joins them together to create a cohesive response. If the parsing fails, it returns the full JSON response for debugging purposes.
Handling User Interactions and Generating Responses
Finally, let’s implement the logic that handles user interactions and triggers the appropriate API calls:
# Generate and display response
if submit_button:
    if api_key == "":
        st.error("Please enter your OpenAI API key")
    elif selected_model == "Select Model":
        st.error("Please select a model")
    elif user_prompt.strip() == "":
        st.error("Please enter a prompt")
    else:
        model_id = model_mapping[selected_model]

        with st.spinner(f"Generating response using {selected_model}..."):
            st.divider()

            if endpoint_type == "Chat Completions":
                response = generate_chat_completion(user_prompt, model_id, api_key)
            else:
                response = generate_direct_response(user_prompt, model_id, api_key)

            # Display the response
            st.markdown(response)

            # Show additional response details in an expander
            with st.expander("View Response Details"):
                st.text("Model: " + model_id)
                st.text("Endpoint: " + endpoint_type)
                st.text("Prompt: " + user_prompt)
This code block runs when the user clicks the “Generate Response” button. It performs several important steps:
- Validates that all required fields (API key, model, and prompt) are filled in
- Maps the selected model name to its corresponding API model ID
- Displays a spinner during the API call to indicate loading
- Calls the appropriate function based on the selected endpoint type
- Displays the response using Markdown formatting
- Provides additional details about the request in an expandable section
The error messages help guide users when they’ve missed entering required information, making the app more user-friendly.
Testing the Application
Once you’ve implemented all the code, you can run your Streamlit application with the following command:
streamlit run app.py
Replace “app.py” with the name of your Python file. This will launch a local web server and open the application in your default browser.
Using the Application Effectively
To use the application:
- Enter your OpenAI API key in the sidebar
- Select which GPT-4.1 model variant you want to test
- Choose whether to use the Chat Completions or Direct Responses API
- Enter your prompt in the text area
- Click “Generate Response” to see the model’s output
The application will display the model’s response directly in the interface, and you can view additional details by expanding the “View Response Details” section.
The Complete OpenAI GPT-4.1 Models API Streamlit App Script
Here’s the full Python script:
import streamlit as st
from streamlit_extras.app_logo import add_logo
from openai import OpenAI
import json
import requests

st.set_page_config(page_title="OpenAI 4.1 Series Tester", layout="wide")

st.title("OpenAI 4.1 Series Tester")
st.divider()

st.markdown(
    """
<style>
#openai-4-1-series-tester {
    font-size: 1.75rem!important;
    font-weight: 700;
    padding: 1.25rem 0px 1rem;
}
.stSidebar a {
    font-weight: 700;
    color: rgb(255, 75, 75);
    text-decoration: none;
}
</style>
""",
    unsafe_allow_html=True,
)

# Sidebar for API key, endpoint and model selection
with st.sidebar:
    st.image("https://i.ibb.co/4nD4P7Nz/logo-white.png", width=150)
    url = "https://walterpinem.com/openai-gpt-4-1/"
    st.write("A Streamlit app to test the newly released GPT-4.1 models.")
    st.markdown("Read full tutorial [here](%s)." % url)
    st.divider()
    st.header("Configurations")
    api_key = st.text_input("OpenAI API Key", type="password")

    model_options = [
        "Select Model",
        "GPT 4.1",
        "GPT 4.1 Mini",
        "GPT 4.1 Nano"
    ]

    endpoint_type = st.radio(
        "API Endpoint",
        ["Chat Completions", "Responses (Direct API)"]
    )

    selected_model = st.selectbox("Select Model", model_options)

# Input area
user_prompt = st.text_area("", placeholder="Insert the prompt...", height=150)
submit_button = st.button("Generate Response", use_container_width=True, type="primary")

# Model ID mapping
model_mapping = {
    "GPT 4.1": "gpt-4.1-2025-04-14",
    "GPT 4.1 Mini": "gpt-4.1-mini-2025-04-14",
    "GPT 4.1 Nano": "gpt-4.1-nano-2025-04-14"
}

# Function to call OpenAI API using chat completions
def generate_chat_completion(prompt, model_id, api_key):
    try:
        client = OpenAI(api_key=api_key)

        # Using the chat completions endpoint
        response = client.chat.completions.create(
            model=model_id,
            messages=[
                {"role": "system", "content": "You are a helpful assistant."},
                {"role": "user", "content": prompt}
            ]
        )

        # Extract the response content
        if hasattr(response, 'choices') and len(response.choices) > 0:
            return response.choices[0].message.content
        else:
            return "No response content available"

    except Exception as e:
        return f"Error: {str(e)}"

# Function to call the new responses API directly
def generate_direct_response(prompt, model_id, api_key):
    try:
        url = "https://api.openai.com/v1/responses"
        headers = {
            "Content-Type": "application/json",
            "Authorization": f"Bearer {api_key}"
        }
        data = {
            "model": model_id,
            "input": prompt
        }

        response = requests.post(url, headers=headers, json=data)

        if response.status_code == 200:
            response_json = response.json()

            # Extract the text from the output structure based on the sample response
            if "output" in response_json and len(response_json["output"]) > 0:
                content = response_json["output"][0].get("content", [])
                if content and len(content) > 0:
                    text_items = [item["text"] for item in content if item["type"] == "output_text"]
                    return "\n".join(text_items)

            # If we couldn't extract text in the expected format, return the full JSON for debugging
            return f"Received response but couldn't parse output text:\n{json.dumps(response_json, indent=2)}"
        else:
            return f"API Error ({response.status_code}): {response.text}"

    except Exception as e:
        return f"Error: {str(e)}"

# Generate and display response
if submit_button:
    if api_key == "":
        st.error("Please enter your OpenAI API key")
    elif selected_model == "Select Model":
        st.error("Please select a model")
    elif user_prompt.strip() == "":
        st.error("Please enter a prompt")
    else:
        model_id = model_mapping[selected_model]

        with st.spinner(f"Generating response using {selected_model}..."):
            st.divider()

            if endpoint_type == "Chat Completions":
                response = generate_chat_completion(user_prompt, model_id, api_key)
            else:
                response = generate_direct_response(user_prompt, model_id, api_key)

            # Display the response
            st.markdown(response)

            # Show additional response details in an expander
            with st.expander("View Response Details"):
                st.text("Model: " + model_id)
                st.text("Endpoint: " + endpoint_type)
                st.text("Prompt: " + user_prompt)
It’s also available on Github. Fork it, extend and customize it as much as you like.
Extending the Application
This application provides a solid foundation that you can extend in several ways:
Adding Temperature and Other Parameters
You could enhance the sidebar to include additional parameters like temperature, max tokens, or top-p sampling to give users more control over the response generation.
# Example addition to the sidebar
with st.sidebar:
    # (existing code)

    advanced_options = st.expander("Advanced Options")
    with advanced_options:
        temperature = st.slider("Temperature", min_value=0.0, max_value=2.0, value=0.7, step=0.1)
        max_tokens = st.number_input("Max Tokens", min_value=1, max_value=4096, value=1024, step=1)
Supporting Response Comparison
You could modify the app to generate responses from multiple models simultaneously, allowing users to compare their outputs side by side.
Adding Response Metrics
For more analytical users, you could add response time tracking and token usage metrics to help evaluate model performance.
Troubleshooting Common Issues
When working with this application, you might encounter some common issues:
API Key Issues
If you’re getting authentication errors, double-check your API key and ensure you have access to the GPT-4.1 model series in your OpenAI account.
Response Parsing Errors
The structure of responses from the Direct API might change over time. If you see errors related to parsing the response, you may need to update the extraction logic in the generate_direct_response function.
Rate Limiting
OpenAI imposes rate limits on API calls. If you’re making many requests in quick succession, you might hit these limits. Consider adding retry logic with exponential backoff to handle rate limiting more gracefully.
Developing a GPT-4.1 Testing App with Streamlit: Conclusion
In this tutorial, I’ve walked you through building a comprehensive Streamlit application for testing OpenAI’s GPT-4.1 model series.
This tool provides an accessible interface for interacting with these powerful language models without writing custom code for each test.
By leveraging Streamlit’s simplicity and the flexibility of OpenAI’s API, we’ve created a valuable tool for developers, researchers, and anyone interested in exploring the capabilities of these advanced language models.
The application’s modular design also makes it easy to extend with additional features as needed.
I hope this tutorial has been helpful, and I encourage you to experiment with the code and adapt it to your specific needs.
The combination of Streamlit and OpenAI’s API opens up countless possibilities for creating interactive AI-powered applications.