
I got to work with a client who owns a travel blog called GetOutTrip last year. They wanted me to create an AI-powered travel tool, and they already had some ideas in mind.
Since their blog is built on WordPress, it made sense for me to develop an AI Travel WordPress Plugin that could integrate directly with their site.
After finishing the first tool, they asked me to create some more. Before I knew it, I had developed a total of 9 AI tools and a currency converter.
The best part? All 10 tools were packaged into a single WordPress plugin, making it easy to use and manage.
Here are the 9 AI travel tools I built for them:
In this post, I’ll be walking you through how to build your very own AI travel tool WordPress plugin. My hope is that this will inspire you to come up with even more innovative ideas and expand on it in any way you like.
Let’s get started.
Creating an AI Travel Tool WordPress Plugin

I’ve had a blast creating several WordPress plugins that are available to the public on the WordPress plugins repository as well as plugins for personal use, others for commercial purposes, and a few are for clients.
Building a WordPress plugin isn’t uncharted territory for me, but I’d be lying if I said it’s always a breeze. You see, I don’t have a background in programming, so I often face challenges when building a plugin.
Luckily, there are some amazing AI coding tools out there that can lend a hand, especially when it comes to making sure the plugin is secure. These tools have been a game-changer for me, and I’m so grateful to have them in my corner.
We’re going to integrate that AI into the plugin we’re building in this post. Now, choosing the right AI models is a big deal – we need to think about how much they cost, the quality of the output, and how easy they are to integrate. So, let’s start with selecting the perfect AI models for our WordPress plugin.
What We are Building
We’re building an AI travel tool specifically AI Travel Itinerary Generator, that will generate a comprehensive travel itinerary based on the destination and selected trip type, e.g. Adventure, Romantic, Solo, etc.
The preview is something like this:
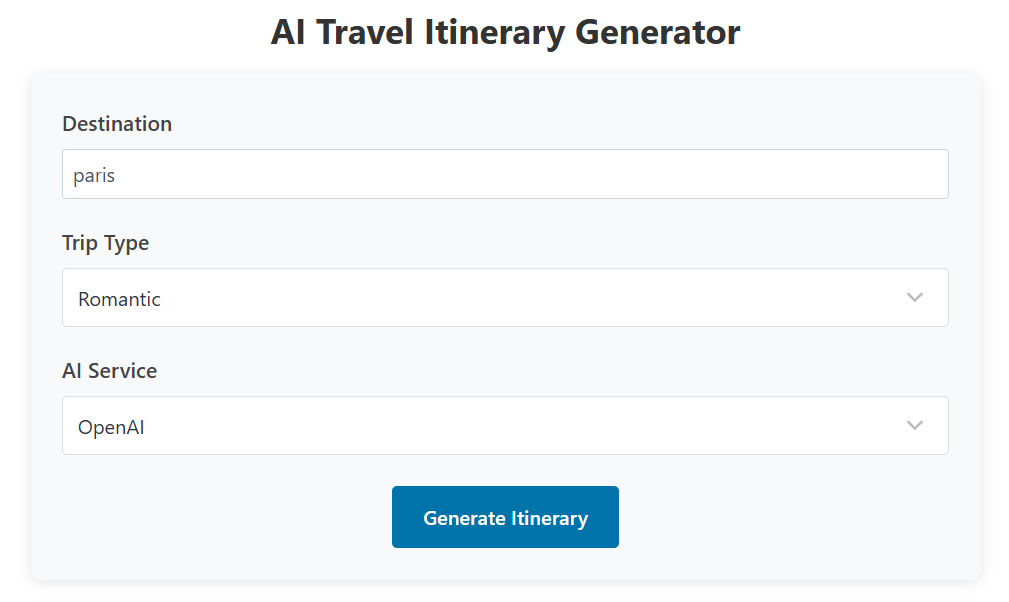
We will create a shortcode to display the above generator UI/form so we can place it anywhere across the WordPress blog.
We just need to insert the destination we plan to visit, select the trip type, then select the AI Service, in this case, we will use OpenAI, Groq, and OpenRouter.
Select the AI Models
I’ve shared some of my experiences with building AI tools using APIs from companies like OpenRouter and Groq in some of my earlier posts.
These providers are definitely worth checking out if you want to test out deploying some AI models and building tools with them – they’re really handy for getting started with AI development.
In case you missed out, here are some AI tools I built:
For the sake of this tutorial, we will use free and/or cheap AI models from OpenAI, OpenRouter and Groq. You can select more AI models later, depending on your needs.
Building the Plugin Structure
After selecting the model, let’s start building the plugin structure. Let’s say that this is the structure of the AI tool plugin we’ll have:
ai-travel-tool-sample/
├── js/
│   └── main.js
├── css/
│   └── style.css
├── inc/
│   ├── handler.php
│   ├── settings.php
│   └── shortcode.php
└── ai-travel-tool-sample.php
What we will create is just a sample plugin that will be very easy to extend such as adding more tools, using more models, etc.
The Plugin Header
At the very minimum, let’s have the following header in our plugin:
<?php
/**
* AI Travel Tool Sample
*
* @package       AITRAVELTOOL
* @author        Walter Pinem
* @version       1.0.0
*
* @wordpress-plugin
* Plugin Name:   AI Travel Tool Sample
* Plugin URI:    https://walterpinem.com/creating-an-ai-travel-tool-wordpress-plugin/
* Description:   A basic sample of the AI Travel Tool.
* Version:       1.0.0
* Author:        Walter Pinem
* Author URI:    https://walterpinem.com/
* Domain Path:   /languages
* License:           GPL v2 or later
* License URI:       https://www.gnu.org/licenses/gpl-2.0.html
* Requires at least: 5.2
* Requires PHP:      8.2
* Text Domain:   ai-travel-tool-sample
*/

// Exit if accessed directly.
if ( ! defined( 'ABSPATH' ) ) exit;
You can add more later, for example if you want to make your plugin translatable, you can add * Domain Path: /languages, or add file-level PHPDoc DocBlock as well as WordPress plugin file headers.
Crafting the Plugin’s Admin Settings Page
Now that we’re getting started, let’s create a settings page that’ll hold all the necessary values our plugin needs to work smoothly, plus some extra dynamic values that we can easily tweak later on without having to deal with a bunch of hardcoded stuff.
Having a well-structured admin settings page is really important. This page is where administrators can set up API keys, choose AI models, and customize prompt templates to get the tool working just the way they want.

In this part, I’ll walk you through each part of the settings.php file, covering everything from setting up the settings class to registering individual settings fields.
Before we get into the nitty-gritty details, let’s take a step back and look at the overall structure of the settings file. The settings.php file defines a class called AITRAVELTOOL_Settings, which wraps up all the functionality needed to create the admin settings page.
When the class is initialized, it hooks into WordPress actions to add the admin menu and register settings, making sure the settings page fits in seamlessly with the WordPress dashboard.
Class Initialization and Constructor
The file kicks off with the definition of the AITRAVELTOOL_Settings class, which plays a starring role in how the settings page works. When you create a new instance of this class, its constructor sets the stage for two pretty important things: adding the admin menu and registering your settings.
class AITRAVELTOOL_Settings {
    public function __construct() {
        // Add admin menu.
        add_action('admin_menu', array($this, 'add_admin_menu'));
        // Register settings.
        add_action('admin_init', array($this, 'register_settings'));
    }
}
When the plugin loads, it automatically takes care of a few important tasks. The admin_menu hook is what adds a custom menu item to the WordPress dashboard, while admin_init sets up and registers all the plugin’s settings, so everything runs smoothly from the start.
Adding the Admin Menu
Next, the add_admin_menu method is responsible for adding a new menu page to the WordPress dashboard. This method uses the add_menu_page function to define the page title, menu title, required capability, slug, callback function, icon, and position.
public function add_admin_menu() {
    add_menu_page(
        __('AI Travel Tool', 'ai-travel-tool-sample'),
        __('AI Travel Tool', 'ai-travel-tool-sample'),
        'manage_options',
        'ai-travel-tool',
        array($this, 'settings_page'),
        'dashicons-airplane',
        25
    );
}
To make this page work just right, we need to set some parameters so only users with the right permissions – namely, the manage_options capability – can get in.
We’ve also added a custom icon, an airplane, to give us a visual cue that this is the travel tool we’re looking for. Later on, we’ll use the settings_page callback function to fill in the actual content of the page.
Registering Plugin Settings
The register_settings method is the core of the settings functionality. It registers settings sections and individual settings fields. This method divides settings into three sections: API Keys, AI Models, and Prompt Template. Each section is accompanied by a callback that provides a description, followed by the registration of specific fields.
API Keys Section
The first section handles the API keys needed to interact with external services like OpenAI, OpenRouter, and Groq. For each API key, the method registers a setting using register_setting and adds a corresponding field using add_settings_field.
// Register API Keys settings section.
add_settings_section(
    'aitraveltool_api_keys_section',
    __('API Keys', 'ai-travel-tool-sample'),
    array($this, 'api_keys_section_callback'),
    'ai-travel-tool'
);
The callback api_keys_section_callback displays a short description prompting the user to enter their API keys securely. Then, for each API key, settings are registered with basic sanitization and a default value of an empty string.
For example, the OpenAI API key is registered and then displayed with a password input field to keep it hidden:
register_setting(
    'aitraveltool_settings',
    'aitraveltool_openai_api_key',
    array(
        'type'              => 'string',
        'sanitize_callback' => array($this, 'sanitize_api_key'),
        'default'           => '',
    )
);
add_settings_field(
    'aitraveltool_openai_api_key',
    __('OpenAI API Key', 'ai-travel-tool-sample'),
    array($this, 'openai_api_key_callback'),
    'ai-travel-tool',
    'aitraveltool_api_keys_section'
);
This pattern repeats for the OpenRouter and Groq API keys, ensuring all necessary external credentials are collected.
AI Models Section
After the API keys, the next section registers settings for selecting AI models. This section is introduced with a callback that describes its purpose.
add_settings_section(
    'aitraveltool_ai_models_section',
    __('AI Models', 'ai-travel-tool-sample'),
    array($this, 'ai_models_section_callback'),
    'ai-travel-tool'
);
Within this section, fields for the OpenAI, OpenRouter, and Groq models are registered. Each field uses a simple text input where we can enter the model ID, along with a default value and description. For instance, the OpenAI model field is set up as follows:
register_setting(
    'aitraveltool_settings',
    'aitraveltool_openai_model',
    array(
        'type'              => 'string',
        'sanitize_callback' => 'sanitize_text_field',
        'default'           => 'gpt-4o-mini',
    )
);
add_settings_field(
    'aitraveltool_openai_model',
    __('OpenAI Model', 'ai-travel-tool-sample'),
    array($this, 'openai_model_callback'),
    'ai-travel-tool',
    'aitraveltool_ai_models_section'
);
Each callback function, such as openai_model_callback, outputs the HTML input element along with a description and a link for more information on available models.
Prompt Template Section
The final settings section is for the prompt template used by the plugin when generating travel itineraries. This section allows administrators to customize the text that the AI will use to generate responses.
add_settings_section(
    'aitraveltool_prompt_section',
    __('Prompt Template', 'ai-travel-tool-sample'),
    array($this, 'prompt_section_callback'),
    'ai-travel-tool'
);
A setting is then registered for the prompt template with a default value provided by the get_default_prompt_template method:
register_setting(
    'aitraveltool_settings',
    'aitraveltool_prompt_template',
    array(
        'type'              => 'string',
        'sanitize_callback' => 'sanitize_textarea_field',
        'default'           => $this->get_default_prompt_template(),
    )
);
add_settings_field(
    'aitraveltool_prompt_template',
    __('Prompt Template', 'ai-travel-tool-sample'),
    array($this, 'prompt_template_callback'),
    'ai-travel-tool',
    'aitraveltool_prompt_section'
);
The prompt_template_callback method renders a textarea where users can input or modify the default prompt template. This template uses placeholders like {trip_type} and {destination} that will be dynamically replaced when generating itineraries.
Callback Functions: Rendering Settings Fields
Each settings field has an associated callback that outputs the HTML for that field. These callbacks ensure that the input is properly formatted and include descriptions for the user.
API Key Field Callbacks
For instance, the callback for the OpenAI API key field is as follows:
public function openai_api_key_callback() {
    $openai_api_key = get_option('aitraveltool_openai_api_key');
    ?>
    <input type="password"
           id="aitraveltool_openai_api_key"
           name="aitraveltool_openai_api_key"
           value="<?php echo esc_attr($openai_api_key); ?>"
           class="regular-text"
           autocomplete="new-password" />
    <p class="description">
        <?php _e('Enter your OpenAI API Key', 'ai-travel-tool-sample'); ?>
    </p>
    <?php
}
This function uses a password input field to keep the API key secure. Similar callbacks exist for OpenRouter and Groq API keys.
AI Model Field Callbacks
The model field callbacks render text inputs and provide helpful descriptions and links. For example:
public function openai_model_callback() {
    $openai_model = get_option('aitraveltool_openai_model', 'gpt-4o-mini');
    ?>
    <input type="text"
           id="aitraveltool_openai_model"
           name="aitraveltool_openai_model"
           value="<?php echo esc_attr($openai_model); ?>"
           class="regular-text" />
    <p class="description">
        <?php echo __('Enter the OpenAI model ID to be used. ', 'ai-travel-tool-sample') .
        '<a href="https://platform.openai.com/docs/models" target="_blank" rel="noopener noreferrer">' .
        __('More models', 'ai-travel-tool-sample') . '</a>'; ?>
    </p>
    <p class="description">
        <?php _e('Default: gpt-4o-mini', 'ai-travel-tool-sample'); ?>
    </p>
    <?php
}
This callback ensures that users understand what model to enter and provides a reference link for additional models.
Prompt Template Callback
The prompt template callback renders a textarea input, allowing users to modify the prompt that will be sent to the AI for generating travel itineraries:
public function prompt_template_callback() {
    $prompt_template = get_option('aitraveltool_prompt_template', $this->get_default_prompt_template());
    ?>
    <textarea id="aitraveltool_prompt_template"
              name="aitraveltool_prompt_template"
              rows="10"
              class="large-text code"><?php echo esc_textarea($prompt_template); ?></textarea>
    <p class="description">
        <?php _e('Customize the prompt template used for generating travel itineraries. Use {trip_type} and {destination} as placeholders.', 'ai-travel-tool-sample'); ?>
    </p>
    <?php
}
This function provides flexibility by letting administrators define how the AI should generate itineraries based on the prompt template.
The Settings Page Rendering
The settings_page method assembles and renders the entire settings page in the WordPress admin dashboard. It begins by checking the user’s capabilities to ensure only administrators can access the page. It then displays any error messages, outputs the page title, and includes a form to save the settings.
    public function settings_page()
    {
        // Check user capabilities.
        if (! current_user_can('manage_options')) {
            return;
        }

        // Add settings error/update messages.
        settings_errors('aitraveltool_messages');
    ?>
        <div class="wrap">
            <h1><?php echo esc_html(get_admin_page_title()); ?></h1>
            <p class="description">
                <?php
                /* translators: %s is the URL of the author */
                printf(
                    __('Crafted by <a href="%s" target="_blank" title="Walter Pinem" rel="noopener noreferrer">Walter Pinem</a>.', 'ai-travel-tool-sample'),
                    esc_url('https://walterpinem.com/')
                );
                ?>
            </p>
            <hr />
            <form action="options.php" method="post">
                <?php
                // Output security fields.
                settings_fields('aitraveltool_settings');

                // Output setting sections and fields.
                do_settings_sections('ai-travel-tool');

                // Output save settings button.
                submit_button(__('Save Settings', 'ai-travel-tool-sample'));
                ?>
            </form>
        </div>
<?php
    }
Here, the settings page is built using WordPress functions like settings_fields() and do_settings_sections(), which automatically output security fields and registered settings sections. The final submit button allows administrators to save their changes.
Sanitization and Default Settings
An important aspect of the settings page is ensuring that our inputs are properly sanitized to prevent security vulnerabilities. The sanitize_api_key method is an example of a sanitization callback used when registering API key settings:
public function sanitize_api_key($key) {
    return sanitize_text_field($key);
}
Additionally, the get_default_prompt_template method provides a default prompt template, ensuring that the plugin has a starting point if the user hasn’t customized the prompt yet:
public function get_default_prompt_template() {
    return 'You are a world-class travel expert. Craft a vivid, detailed itinerary for a {trip_type} trip to {destination} that blends iconic landmarks with off-the-beaten-path discoveries. Highlight must-see attractions, authentic local experiences, unique cuisine, and seasonal events to inspire an unforgettable journey.';
}
This default value is used when registering the prompt template setting, ensuring consistency and usability out-of-the-box.
Building the Handler: A Step-by-Step Walkthrough
In this section, I’ll explain how I built the handler for my AI Travel Tool WordPress plugin. This file, handler.php, manages user input, validates it, and sends requests to different AI APIs to generate travel itineraries.
I’ll break down each part of the code and explain how it all works together.
Defining the Handler Class
I encapsulated all the functionality in a class called AITRAVELTOOL_Handler. This helps keep the code organized and makes it easier to maintain.
The Constructor
In the constructor, I hook into WordPress’s AJAX actions. This ensures that the function to generate a travel itinerary is available to both logged-in users and visitors.
public function __construct()
{
    // Register AJAX actions.
    add_action('wp_ajax_aitraveltool_generate_itinerary', array($this, 'generate_itinerary'));
    add_action('wp_ajax_nopriv_aitraveltool_generate_itinerary', array($this, 'generate_itinerary'));
}
I use add_action to register the AJAX endpoints. The first hook (wp_ajax_...) is for logged-in users, while wp_ajax_nopriv_... makes the function available to non-logged-in users as well.
Generating the Travel Itinerary
The heart of this handler is the generate_itinerary() function. This function takes user input from an AJAX request, validates it, and calls the appropriate AI API to generate a travel itinerary.
Validating the Request
First, let’s perform a security check using a nonce:
if (! isset($_POST['nonce']) || ! wp_verify_nonce(sanitize_text_field(wp_unslash($_POST['nonce'])), 'aitraveltool_nonce')) {
    wp_send_json_error(array('message' => __('Security check failed.', 'ai-travel-tool-sample')));
}
This ensures that the request is legitimate. We sanitize the nonce and verify it using wp_verify_nonce(). If the check fails, an error response is sent back immediately.
Gathering and Sanitizing User Input
Next, we retrieve and sanitize the user inputs for destination and trip type:
$destination = isset($_POST['destination']) ? sanitize_text_field(wp_unslash($_POST['destination'])) : '';
$trip_type   = isset($_POST['trip_type']) ? sanitize_text_field(wp_unslash($_POST['trip_type'])) : '';
Using sanitize_text_field() and wp_unslash(), We ensure that the input is safe for processing.
We also validate that these fields are not empty:
if (empty($destination) || empty($trip_type)) {
    wp_send_json_error(array('message' => __('Destination and trip type are required.', 'ai-travel-tool-sample')));
}
If either is missing, then return an error.
Determining the API Service and Retrieving the API Key
We let the user choose which AI service to use by checking the api_service parameter, then retrieve the corresponding API key using a helper function:
$api_service = isset($_POST['api_service']) ? sanitize_text_field(wp_unslash($_POST['api_service'])) : 'openai';
$api_key     = $this->get_api_key($api_service);

if (empty($api_key)) {
    wp_send_json_error(array('message' => __('API key not configured. Please check the plugin settings.', 'ai-travel-tool-sample')));
}
The get_api_key() function uses a simple switch-case to return the appropriate API key based on the selected service (OpenAI, OpenRouter, or Groq).
Preparing the AI Request
Now it’s time to preparing the request and send to the AI.
Retrieving and Customizing the Prompt Template
We retrieve the prompt template from the plugin options, which allows us to customize it. If it’s empty, we use a default value:
$prompt_template = get_option('aitraveltool_prompt_template');
if (false === $prompt_template || trim($prompt_template) === '') {
    $prompt_template = $this->get_default_prompt_template();
    error_log('Using default prompt template.');
} else {
    error_log('Retrieved prompt template: ' . $prompt_template);
}
We then replace the placeholders {destination} and {trip_type} with the actual user-provided values:
$prompt = str_replace(
    array('{destination}', '{trip_type}'),
    array(ucfirst($destination), $trip_type),
    $prompt_template
);
If, after replacement, the prompt is empty, we set a fallback prompt to ensure that something is sent to the API:
if (empty(trim($prompt))) {
    $prompt = "Create a detailed $trip_type itinerary for $destination.";
    error_log('Empty prompt after replacement, using direct fallback.');
}
We then log the final prompt for debugging purposes.
Calling the AI API
With the prompt ready, we can call the appropriate AI API by using the call_ai_api() method. This method chooses the correct API call function based on the selected service:
$response = $this->call_ai_api($api_service, $api_key, $prompt);
if (is_wp_error($response)) {
    wp_send_json_error(array('message' => $response->get_error_message()));
}
wp_send_json_success(array('itinerary' => $response));
If an error occurs, it will return an error response. Otherwise, it will send back the AI-generated itinerary as a success response.
Retrieving the API Key
The get_api_key() method checks the service name and retrieves the corresponding API key from the plugin settings:
private function get_api_key($service)
{
    switch ($service) {
        case 'openai':
            return get_option('aitraveltool_openai_api_key', '');
        case 'openrouter':
            return get_option('aitraveltool_openrouter_api_key', '');
        case 'groq':
            return get_option('aitraveltool_groq_api_key', '');
        default:
            return '';
    }
}
This function ensures that each API service (OpenAI, OpenRouter, Groq) uses its own stored API key.
Calling the Appropriate AI API
The call_ai_api() function routes the prompt to the correct API call method based on the selected service:
private function call_ai_api($service, $api_key, $prompt)
{
    switch ($service) {
        case 'openai':
            return $this->call_openai_api($api_key, $prompt);
        case 'openrouter':
            return $this->call_openrouter_api($api_key, $prompt);
        case 'groq':
            return $this->call_groq_api($api_key, $prompt);
        default:
            return new WP_Error('invalid_service', __('Invalid AI service specified.', 'ai-travel-tool-sample'));
    }
}
This abstraction allows the handler to support multiple AI services seamlessly.
OpenAI API Call
The call_openai_api() method prepares a request to OpenAI’s API endpoint, using dynamic model settings and sending the prompt as a chat message.
private function call_openai_api($api_key, $prompt)
{
    $url = 'https://api.openai.com/v1/chat/completions';
    $model = get_option('aitraveltool_openai_model', 'gpt-4o-mini');

    $headers = array(
        'Authorization' => 'Bearer ' . $api_key,
        'Content-Type'  => 'application/json',
    );

    $body = array(
        'model'       => $model,
        'messages'    => array(
            array(
                'role'    => 'user',
                'content' => $prompt,
            ),
        ),
        'temperature' => 0.7,
        'max_tokens'  => 2000,
    );

    $args = array(
        'headers' => $headers,
        'body'    => wp_json_encode($body),
        'method'  => 'POST',
        'timeout' => 60,
    );

    $response = wp_remote_request($url, $args);

    if (is_wp_error($response)) {
        return $response;
    }

    $response_code = wp_remote_retrieve_response_code($response);
    $response_body = wp_remote_retrieve_body($response);
    $response_data = json_decode($response_body, true);

    if (200 !== $response_code) {
        $error_message = isset($response_data['error']['message'])
            ? $response_data['error']['message']
            : __('Unknown API error', 'ai-travel-tool-sample');
        return new WP_Error('api_error', $error_message);
    }

    return isset($response_data['choices'][0]['message']['content'])
        ? $response_data['choices'][0]['message']['content']
        : '';
}
Here, what we do is:
- Set the endpoint URL.
- Retrieve the model setting dynamically.
- Prepare headers and body data.
- Handle errors by checking the response code and returning a WP_Error if needed.
- Return the generated content from the API response.
OpenRouter and Groq API Calls
The methods call_openrouter_api() and call_groq_api() are similar in structure to the OpenAI API call, with slight differences such as the base URL, headers, and default model settings. Both functions perform the following tasks:
- Verify the prompt and use a fallback if necessary.
- Log debug information to assist in troubleshooting.
- Build and send the HTTP POST request.
- Check the response and extract the generated content.
For example, the OpenRouter API call:
private function call_openrouter_api($api_key, $prompt)
{
    $url = 'https://openrouter.ai/api/v1/chat/completions';
    $model = get_option('aitraveltool_openrouter_model', 'meta-llama/llama-3.3-70b-instruct:free');

    error_log('OpenRouter received prompt: "' . $prompt . '"');

    $headers = array(
        'Authorization' => 'Bearer ' . $api_key,
        'Content-Type'  => 'application/json',
        'HTTP-Referer'  => get_site_url(),
        'X-Title'       => get_bloginfo('name'),
    );

    if (empty(trim($prompt))) {
        $prompt = "Please create a travel itinerary.";
        error_log('OpenRouter using fallback prompt due to empty input');
    }

    $body = array(
        'model'       => $model,
        'messages'    => array(
            array(
                'role'    => 'user',
                'content' => $prompt,
            ),
        ),
        'temperature' => 0.7,
        'max_tokens'  => 2000,
    );

    error_log('OpenRouter request body: ' . wp_json_encode($body));

    $args = array(
        'headers' => $headers,
        'body'    => wp_json_encode($body),
        'method'  => 'POST',
        'timeout' => 120,
    );

    $response = wp_remote_request($url, $args);

    if (is_wp_error($response)) {
        error_log('OpenRouter error: ' . $response->get_error_message());
        return $response;
    }

    $response_code = wp_remote_retrieve_response_code($response);
    $response_body = wp_remote_retrieve_body($response);

    error_log('OpenRouter response code: ' . $response_code);
    error_log('OpenRouter response preview: ' . substr($response_body, 0, 200) . '...');

    $response_data = json_decode($response_body, true);

    if (200 !== $response_code) {
        $error_message = isset($response_data['error']['message'])
            ? $response_data['error']['message']
            : __('Unknown API error', 'ai-travel-tool-sample');
        error_log('OpenRouter error message: ' . $error_message);
        return new WP_Error('api_error', $error_message);
    }

    return isset($response_data['choices'][0]['message']['content'])
        ? $response_data['choices'][0]['message']['content']
        : '';
}
Similarly, the call_groq_api() method handles API requests for the Groq service. They all follow the same pattern: constructing the request, logging details, handling errors, and returning the AI-generated itinerary.
Initializing the Handler
At the very end of the file, we instantiate the AITRAVELTOOL_Handler class so that all of these hooks and functionalities are registered with WordPress:
// Initialize the handler.
$aitraveltool_handler = new AITRAVELTOOL_Handler();
This line makes sure that as soon as the plugin is loaded, the handler class is instantiated and the AJAX actions for generating travel itineraries are active.
Building the Shortcode Interface for the AI Travel Tool WordPress Plugin
Now, in order to display the itinerary generator tool anywhere across the WordPress blog, we will use a shortcode.
In this section, I’ll walk you through the inner workings of the shortcode functionality for the AI Travel Tool WordPress plugin. The shortcode is a key component that allows us to display the AI Travel Tool generator UI or form directly on a page or post. I’ve built this using a dedicated shortcode.php file, and I’ll explain each part of the code in detail, sharing my thought process along the way.
The Shortcode Class Definition and Constructor
We start by defining the AITRAVELTOOL_Shortcode class, which encapsulates all the logic for rendering the shortcode and enqueuing the necessary assets. In the constructor, we hook into WordPress actions to register the shortcode and to ensure that the CSS and JavaScript files are loaded only when needed.
// Register shortcode and enqueue scripts/styles.
public function __construct()
{
    add_shortcode('ai_travel_tool', array($this, 'render_shortcode'));
    add_action('wp_enqueue_scripts', array($this, 'enqueue_assets'));
}
We use add_shortcode to register the [ai_travel_tool] shortcode so that whenever this shortcode is inserted into a post or page, WordPress will call the render_shortcode method.
Simultaneously, we attach the enqueue_assets method to the wp_enqueue_scripts hook, which ensures that the plugin’s styles and scripts are loaded only when the shortcode is present on the page.
Enqueuing Assets for the Shortcode
Next, let’s focus on the enqueue_assets method. This part is crucial because it prevents unnecessary loading of CSS and JavaScript files on pages that don’t use the shortcode, which helps keep the site performance optimal.
public function enqueue_assets()
{
    global $post;
    if (is_a($post, 'WP_Post') && has_shortcode($post->post_content, 'ai_travel_tool')) {
        // Enqueue CSS.
        wp_enqueue_style(
            'aitraveltool-style',
            AITRAVELTOOL_PLUGIN_URL . 'css/style.css',
            array(),
            AITRAVELTOOL_VERSION
        );

        // Enqueue JS.
        wp_enqueue_script(
            'aitraveltool-script',
            AITRAVELTOOL_PLUGIN_URL . 'js/main.js',
            array('jquery'),
            AITRAVELTOOL_VERSION,
            true
        );

        // Localize script for AJAX.
        wp_localize_script(
            'aitraveltool-script',
            'aitraveltool_params',
            array(
                'ajax_url' => admin_url('admin-ajax.php'),
                'nonce'    => wp_create_nonce('aitraveltool_nonce'),
                'loading'  => __('Generating your personalized travel itinerary...', 'ai-travel-tool-sample'),
                'error'    => __('An error occurred. Please try again.', 'ai-travel-tool-sample'),
            )
        );
    }
}
Here’s what happens in this method:
- Conditional Loading: I use
global $postandhas_shortcode()to check if the current post contains the[ai_travel_tool]shortcode. If it does, I load the assets. - Enqueueing Styles and Scripts: I call
wp_enqueue_style()andwp_enqueue_script()with the plugin URL and version constants, ensuring that my custom styles and JavaScript are loaded only when necessary. - Localizing Scripts: With
wp_localize_script(), I pass AJAX parameters (like the AJAX URL and a security nonce) to the JavaScript file. This step is crucial for making secure AJAX calls from the front-end.
Rendering the Shortcode
The heart of the shortcode functionality lies in the render_shortcode method. This method outputs the HTML for the AI Travel Tool generator UI. We start by checking whether any API keys are configured; if not, it will display an error message to administrators or a generic message for other users.
public function render_shortcode($atts)
{
    // Check if any API key is configured.
    $openai_api_key = get_option('aitraveltool_openai_api_key', '');
    $openrouter_api_key = get_option('aitraveltool_openrouter_api_key', '');
    $groq_api_key = get_option('aitraveltool_groq_api_key', '');

    if (empty($openai_api_key) && empty($openrouter_api_key) && empty($groq_api_key)) {
        if (current_user_can('manage_options')) {
            return '<div class="aitraveltool-error">' .
                __('AI Travel Tool: Please configure at least one API key in the plugin settings.', 'ai-travel-tool-sample') .
                ' <a href="' . admin_url('admin.php?page=ai-travel-tool') . '">' .
                __('Go to Settings', 'ai-travel-tool-sample') .
                '</a></div>';
        } else {
            return '<div class="aitraveltool-error">' .
                __('AI Travel Tool is not properly configured. Please contact the site administrator.', 'ai-travel-tool-sample') .
                '</div>';
        }
    }
Processing Shortcode Attributes
After checking for API keys, we merge the default shortcode attributes with any provided by the user using shortcode_atts(). This ensures that the UI displays default labels and options if none are explicitly set.
$atts = shortcode_atts(
    array(
        'title'              => __('AI Travel Itinerary Generator', 'ai-travel-tool-sample'),
        'destination_label'  => __('Destination', 'ai-travel-tool-sample'),
        'trip_type_label'    => __('Trip Type', 'ai-travel-tool-sample'),
        'button_text'        => __('Generate Itinerary', 'ai-travel-tool-sample'),
        'trip_types'         => 'Adventure,Family,Romantic,Solo,Business,Cultural,Luxury,Budget,Foodie,Wellness',
        'default_api'        => 'openai',
        'show_api_selector'  => 'yes',
    ),
    $atts,
    'ai_travel_tool'
);
We then convert the comma-separated trip_types string into an array so that we can easily loop through it when generating the <select> options.
$trip_types = explode(',', $atts['trip_types']);
Outputting the HTML Form
We use output buffering (ob_start() and ob_get_clean()) to capture the HTML for the shortcode output. This includes various form fields such as text input for the destination, a select dropdown for trip type, and optionally a selector for the API service.
If the show_api_selector attribute is set to “yes”, the form displays a dropdown with options for OpenAI, OpenRouter, and Groq based on whether their respective API keys are configured.
ob_start();
?>
<div class="aitraveltool-container">
    <h2 class="aitraveltool-title"><?php echo esc_html($atts['title']); ?></h2>
    <div class="aitraveltool-form">
        <div class="aitraveltool-field">
            <label for="aitraveltool-destination"><?php echo esc_html($atts['destination_label']); ?></label>
            <input type="text" id="aitraveltool-destination" placeholder="<?php esc_attr_e('e.g. Tokyo, Paris, Bali', 'ai-travel-tool-sample'); ?>" required>
        </div>
        <div class="aitraveltool-field">
            <label for="aitraveltool-trip-type"><?php echo esc_html($atts['trip_type_label']); ?></label>
            <select id="aitraveltool-trip-type" required>
                <option value=""><?php esc_html_e('Select trip type', 'ai-travel-tool-sample'); ?></option>
                <?php foreach ($trip_types as $trip_type) : ?>
                    <option value="<?php echo esc_attr(trim($trip_type)); ?>"><?php echo esc_html(trim($trip_type)); ?></option>
                <?php endforeach; ?>
            </select>
        </div>
        <?php if ($atts['show_api_selector'] === 'yes') : ?>
            <div class="aitraveltool-field">
                <label for="aitraveltool-api-service"><?php esc_html_e('AI Service', 'ai-travel-tool-sample'); ?></label>
                <select id="aitraveltool-api-service">
                    <?php if (! empty($openai_api_key)) : ?>
                        <option value="openai" <?php selected($atts['default_api'], 'openai'); ?>>OpenAI</option>
                    <?php endif; ?>
                    <?php if (! empty($openrouter_api_key)) : ?>
                        <option value="openrouter" <?php selected($atts['default_api'], 'openrouter'); ?>>OpenRouter</option>
                    <?php endif; ?>
                    <?php if (! empty($groq_api_key)) : ?>
                        <option value="groq" <?php selected($atts['default_api'], 'groq'); ?>>Groq</option>
                    <?php endif; ?>
                </select>
            </div>
        <?php else : ?>
            <input type="hidden" id="aitraveltool-api-service" value="<?php echo esc_attr($atts['default_api']); ?>">
        <?php endif; ?>
        <div class="aitraveltool-button-container">
            <button id="aitraveltool-generate-btn" class="aitraveltool-button"><?php echo esc_html($atts['button_text']); ?></button>
        </div>
    </div>
    <div id="aitraveltool-loading" class="aitraveltool-loading" style="display: none;">
        <div class="aitraveltool-spinner"></div>
        <p><?php esc_html_e('Generating your personalized travel itinerary...', 'ai-travel-tool-sample'); ?></p>
    </div>
    <div id="aitraveltool-result" class="aitraveltool-result" style="display: none;"></div>
</div>
<?php
return ob_get_clean();
This HTML creates a user-friendly interface for the AI Travel Tool:
- Form Fields: Users can enter a destination and select a trip type.
- API Selector: Depending on the configuration, users can choose which AI service to use.
- Loading Indicator: A hidden element that will display a loading animation during the API call.
- Result Container: A hidden div where the generated travel itinerary will eventually be displayed.
We use WordPress functions like esc_html() and esc_attr() to ensure that the output is safe and properly formatted.
Initializing the Shortcode
At the end of the file, we instantiate the AITRAVELTOOL_Shortcode class so that WordPress registers the shortcode and enqueues the assets automatically.
$aitraveltool_shortcode = new AITRAVELTOOL_Shortcode();
This line of code is essential as it hooks everything together, making sure that the shortcode [ai_travel_tool] is recognized and that the corresponding UI is rendered when the shortcode is used on a page or post.
When I was building the shortcode functionality for my AI Travel Tool plugin, my main goal was to make it really easy to use and integrate well with WordPress.
To do this, I used a special class just for handling the shortcode, and I made sure that scripts and styles only load when they’re actually needed. This approach helps keep the plugin running smoothly and efficiently.
Testing the AI Travel Tool: Generate a Bali Travel Itinerary
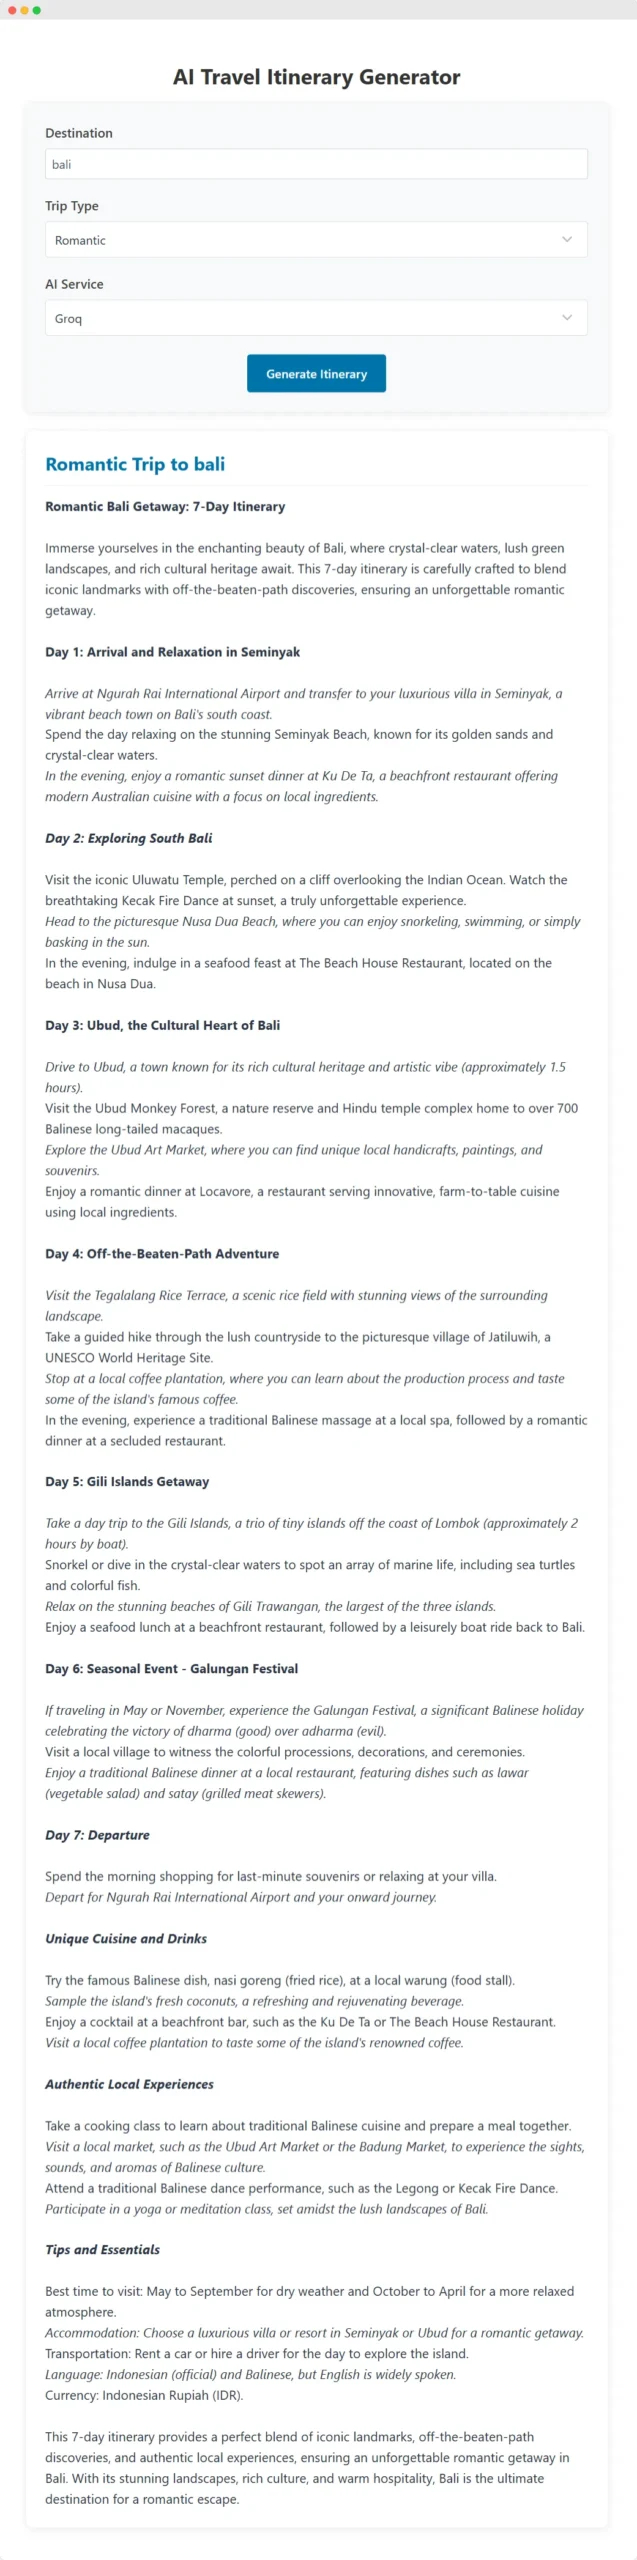
After tested the tool we’ve just built, you can see the output on the screenshot above. The quality of the result will depend on the selected AI model and the prompt, so you can tweak those later.
You can find all the code on this Github repository.
I’m really hoping this step-by-step guide on building an AI Travel Tool WordPress Plugin has been super helpful in giving you a solid grasp of how the code works.
Maybe it’s even sparked some ideas for your own WordPress plugin projects!
If you’ve got questions or suggestions, don’t hesitate to get in touch or leave a comment on the Github repository – I’d love to hear from you. Happy coding, and happy travels!