Deploying WordPress on DigitalOcean provides a powerful and affordable option for website owners who want optimal performance and scalability.
Although this process may seem daunting for beginners, it can be divided into manageable steps to ensure a smooth transition from idea to live website.
By following a methodical approach, users can utilize DigitalOcean’s infrastructure to establish a secure, efficient, and flexible WordPress environment.
The process of choosing the appropriate droplet and configuring advanced settings involves important choices that will influence your online presence.
TL;DR
Hide- DigitalOcean offers a powerful and affordable option for WordPress deployment, providing a scalable and secure environment for websites.
- The platform provides a one-click WordPress installer, streamlining the setup process and reducing technical expertise required.
- DigitalOcean's competitive pricing structure and user-friendly interface make it an attractive option for developers and innovators, starting at just $5 per month for basic configurations.
- The platform offers flexible resizing capabilities, allowing users to scale their resources up or down based on their website's performance needs, ensuring ideal efficiency and cost-effectiveness.
- DigitalOcean has a rich community and extensive knowledgebase, providing valuable resources and insights for users, including tutorials, Q&A, projects, and marketplace.
- The platform provides automated backups, firewalls, and monitoring tools, guaranteeing WordPress sites remain protected and secure.
- DigitalOcean's community-driven approach fosters collaboration and knowledge sharing among developers, making it an ideal platform for WordPress deployment.
- Installing WordPress on DigitalOcean requires several key steps, including organizing your account, creating a project, setting up a WordPress droplet, and accessing the droplet via SSH.
- Setting up a domain name requires creating an A record in the DNS zone editor, linking to your droplet's IP address, and modifying the WordPress site URL.
- Enabling HTTPS on a WordPress site hosted on DigitalOcean involves obtaining an SSL certificate, configuring the web server, and updating the WordPress site URL.
- DigitalOcean offers built-in backup feature and third-party solutions like SnapShooter for automated backups, providing an exhaustive backup strategy for WordPress sites.
- The platform provides an intuitive interface for managing SSH keys, streamlining the process for users seeking innovative deployment solutions.
- DigitalOcean's approach to WordPress hosting combines simplicity with scalability, making it an attractive option for developers and businesses seeking innovative cloud solutions.
This guide will walk you through the steps to effectively set up your WordPress site on DigitalOcean for the best results.
Why Choose DigitalOcean for WordPress Hosting
Cloud hosting providers offer numerous options for WordPress deployment, but DigitalOcean stands out as a compelling choice.
Its focus on simplicity and scalability makes it an attractive platform for developers and innovators seeking efficient WordPress hosting solutions.
DigitalOcean’s competitive pricing structure and user-friendly interface provide a cost-effective and accessible entry point for those looking to host WordPress websites.
One of DigitalOcean’s key advantages is its one-click WordPress installer, streamlining the setup process for users. This feature, combined with the ability to install WordPress on Ubuntu, offers flexibility and customization options.
Also read: Update WordPress Plugin with TortoiseSVN Guide
The platform’s dynamic resizing capabilities allow for seamless scaling as website traffic grows, ensuring peak performance.
DigitalOcean’s community-driven approach fosters innovation and knowledge sharing among users. This collaborative environment is particularly beneficial for those exploring advanced techniques, such as how to host WordPress websites on DigitalOcean or optimize their deployments.
The platform’s reputation among developers further solidifies its position as a reliable choice for WordPress hosting.
With transparent DigitalOcean WordPress pricing and robust features, users can confidently deploy and manage their WordPress sites while leveraging the power of cloud infrastructure.
Build AI Travel Tool Plugin for WordPress
Summarize with: ChatGPT Grok Perplexity Claude I got to work with a client who owns a travel blog ... Read More
Why I Love DigitalOcean
DigitalOcean stands out as an exceptional WordPress hosting platform due to its affordable pricing structure and user-friendly 1-Click WordPress Installer.
The platform’s rich community and extensive knowledgebase provide invaluable resources for users at all skill levels. Additionally, DigitalOcean’s flexible resizing options and widespread trust among developers worldwide contribute to its appeal as a robust hosting solution.
Affordable Pricing
Affordability stands out as one of the key reasons developers and businesses gravitate towards DigitalOcean for WordPress hosting.
The platform’s competitive pricing structure allows users to scale their projects efficiently without breaking the bank.
DigitalOcean’s WordPress droplets offer a cost-effective solution for hosting websites, starting at just $5 per month for basic configurations.
Basic Regular Droplets
| Memory | vCPU | Transfer | SSD | $/hr | $/mo | |
|---|---|---|---|---|---|---|
| 512 MiB | 1 vCPU | 500 GiB | 10 GiB | $0.00595 | $4.00 | Get $200 Free Credit |
| 1 GiB | 1 vCPU | 1,000 GiB | 25 GiB | $0.00893 | $6.00 | Get $200 Free Credit |
| 2 GiB | 1 vCPU | 2,000 GiB | 50 GiB | $0.01786 | $12.00 | Get $200 Free Credit |
| 2 GiB | 2 vCPUs | 3,000 GiB | 60 GiB | $0.02679 | $18.00 | Get $200 Free Credit |
| 4 GiB | 2 vCPUs | 4,000 GiB | 80 GiB | $0.03571 | $24.00 | Get $200 Free Credit |
| 8 GiB | 4 vCPUs | 5,000 GiB | 160 GiB | $0.07143 | $48.00 | Get $200 Free Credit |
| 16 GiB | 8 vCPUs | 6,000 GiB | 320 GiB | $0.14286 | $96.00 | Get $200 Free Credit |
Basic Premium Intel Droplets
| Memory | vCPU | Transfer | SSD | $/hr | $/mo | |
|---|---|---|---|---|---|---|
| 1 GiB | 1 vCPU | 1,000 GiB | 35 GiB | $0.01190 | $8.00 | Get $200 Free Credit |
| 2 GiB | 1 vCPU | 2,000 GiB | 70 GiB | $0.02381 | $16.00 | Get $200 Free Credit |
| 2 GiB | 2 vCPUs | 3,000 GiB | 90 GiB | $0.03571 | $24.00 | Get $200 Free Credit |
| 4 GiB | 2 vCPUs | 4,000 GiB | 120 GiB | $0.04762 | $32.00 | Get $200 Free Credit |
| 8 GiB | 2 vCPUs | 5,000 GiB | 160 GiB | $0.07143 | $48.00 | Get $200 Free Credit |
| 8 GiB | 4 vCPUs | 6,000 GiB | 240 GiB | $0.09524 | $64.00 | Get $200 Free Credit |
| 16 GiB | 4 vCPUs | 8,000 GiB | 320 GiB | $0.14286 | $96.00 | Get $200 Free Credit |
| 16 GiB | 8 vCPUs | 9,000 GiB | 480 GiB | $0.19048 | $128.00 | Get $200 Free Credit |
| 32 GiB | 8 vCPUs | 10,000 GiB | 640 GiB | $0.28571 | $192.00 | Get $200 Free Credit |
Basic Premium AMD Droplets
| Memory | vCPU | Transfer | SSD | $/hr | $/mo | |
|---|---|---|---|---|---|---|
| 1 GiB | 1 vCPU | 1,000 GiB | 25 GiB | $0.01042 | $7.00 | Get $200 Free Credit |
| 2 GiB | 1 vCPU | 2,000 GiB | 50 GiB | $0.02083 | $14.00 | Get $200 Free Credit |
| 2 GiB | 2 vCPUs | 3,000 GiB | 60 GiB | $0.03125 | $21.00 | Get $200 Free Credit |
| 4 GiB | 2 vCPUs | 4,000 GiB | 80 GiB | $0.04167 | $28.00 | Get $200 Free Credit |
| 8 GiB | 2 vCPUs | 5,000 GiB | 100 GiB | $0.06250 | $42.00 | Get $200 Free Credit |
| 8 GiB | 4 vCPUs | 5,000 GiB | 160 GiB | $0.08333 | $56.00 | Get $200 Free Credit |
| 16 GiB | 4 vCPUs | 8,000 GiB | 200 GiB | $0.12500 | $84.00 | Get $200 Free Credit |
| 16 GiB | 8 vCPUs | 6,000 GiB | 320 GiB | $0.16667 | $112.00 | Get $200 Free Credit |
| 32 GiB | 8 vCPUs | 10,000 GiB | 400 GiB | $0.25000 | $168.00 | Get $200 Free Credit |
The pricing model is transparent, with no hidden fees or long-term commitments. Users can easily install WordPress on Ubuntu using DigitalOcean’s one-click installer, streamlining the setup process.
This approach allows for quick deployment of WordPress on DigitalOcean, reducing time-to-market for projects.
The platform’s affordability extends beyond initial costs, as users can dynamically resize their droplets to accommodate traffic spikes or growing resource needs.
This flexibility guarantees ideal resource allocation and cost-efficiency, making DigitalOcean an attractive choice for innovative WordPress deployments.
Asides from Digitalocean, I’d also recommend VPS Mart as it’s also reliable and affordable. (P.S. I’m also using it)
1-Click WordPress Installer

Among the standout features of DigitalOcean’s WordPress hosting solution is its 1-click WordPress installer. This innovative tool streamlines the process of setting up a WordPress site, enabling users to deploy their web presence efficiently.
The 1-click installer automates several critical steps in the WordPress setup process, dramatically reducing the technical expertise required to launch a site.
To install WordPress on DigitalOcean using the 1-click installer:
- Create a new droplet and select “WordPress on 22.04” from the one-click apps tab
- Choose your preferred server specifications and datacenter region
- Add SSH keys for secure access (optional but recommended)
- Click “Create Droplet” to initiate the installation process
Once the droplet is provisioned, users can access their new WordPress installation by accessing the droplet’s IP address in a web browser.
The 1-click installer configures essential components, including the LAMP stack (Linux, Apache, MySQL, PHP), optimizing the environment for WordPress performance.
This automated approach substantially reduces the complexity of manually installing WordPress on Ubuntu or other Linux distributions, allowing users to focus on content creation and site customization rather than server configuration.
Rich Community and Knowledgebase
While many cloud hosting providers focus solely on infrastructure, DigitalOcean stands out for its rich community and extensive knowledgebase.
This community-driven approach fosters innovation and collaboration among developers, making it an ideal platform for WordPress deployment.
DigitalOcean’s community features include:
- Tutorials: In-depth guides on various topics, including WordPress optimization and security.
- Q&A: A forum where users can ask questions and receive expert answers.
- Projects: Curated collections of tutorials for specific tasks or technologies.
- Marketplace: A hub for discovering and sharing open-source tools and applications.
The knowledgebase complements the community by providing:
- API documentation: Detailed information for developers integrating DigitalOcean services.
- Product updates: Regular announcements about new features and improvements.
- Troubleshooting guides: Step-by-step solutions for common issues.
This ecosystem of resources empowers users to overcome challenges, implement best practices, and stay updated on the latest developments in cloud hosting and WordPress deployment.
Flexible Resizing
DigitalOcean’s flexible resizing capabilities stand out as a key feature for WordPress deployment. This functionality allows users to scale their resources up or down based on their website’s performance needs, ensuring ideal efficiency and cost-effectiveness.
The ability to dynamically adjust server specifications provides a significant advantage for WordPress site owners, particularly those experiencing fluctuating traffic patterns or rapid growth.
The flexible resizing process on DigitalOcean involves the following steps:
- Assess current resource utilization
- Select a new droplet size
- Initiate the resize process
- Verify the new configuration
By leveraging DigitalOcean’s resizing options, WordPress site owners can efficiently manage their hosting resources, avoiding over-provisioning or under-provisioning scenarios.
This adaptability is vital for maintaining site performance during traffic spikes or seasonal fluctuations. Additionally, the ability to upgrade CPU, RAM, and storage independently allows for precise resource allocation, fine-tuning both performance and cost.
DigitalOcean’s user-friendly interface simplifies the resizing process, enabling quick adjustments without significant downtime.
This feature empowers WordPress site owners to maintain agility in their hosting strategy, adapting to changing requirements and maximizing their investment in cloud infrastructure.
Trusted by Developers Worldwide
Developers worldwide have embraced DigitalOcean as a trusted platform for WordPress deployment, extending beyond its flexible resizing capabilities. This trust stems from DigitalOcean’s commitment to simplicity, performance, and developer-centric features.
The platform’s intuitive interface and streamlined processes enable rapid deployment, allowing developers to focus on innovation rather than infrastructure management.
DigitalOcean’s robust API and thorough documentation empower developers to automate workflows and integrate WordPress deployments into their existing development pipelines.
The platform’s extensive library of tutorials and community-driven resources further enhance its appeal, providing valuable insights and best practices for optimizing WordPress installations.
Security is paramount in DigitalOcean’s ecosystem, with features like automated backups, firewalls, and monitoring tools guaranteeing WordPress sites remain protected.
The platform’s global network of data centers guarantees low-latency access for users worldwide, while its scalable architecture accommodates traffic spikes effortlessly.
DigitalOcean’s commitment to transparency, regular feature updates, and competitive pricing model solidify its position as a go-to solution for developers seeking a reliable, high-performance WordPress hosting environment.
Installing WordPress on DigitalOcean
Installing WordPress on DigitalOcean requires several key steps.
First, organize your DigitalOcean account by creating a project and setting up a WordPress droplet.
Next, access the droplet via SSH to configure the server environment.
Organizing DigitalOcean Account: Understanding Projects
When managing multiple WordPress installations on DigitalOcean, organizing your account through projects is essential for efficient resource management.
Projects allow you to group related resources, such as droplets, domains, and databases, into logical units.
This structure simplifies administration, improves collaboration, and enhances overall account organization.
To create and manage projects in DigitalOcean:
- Navigate to the Projects page in your DigitalOcean dashboard
- Click “New Project” and provide a name and description
- Assign resources to the project by selecting them from your account
- Invite team members and set appropriate access permissions
Projects offer several benefits for WordPress deployments. They enable you to separate development, staging, and production environments, facilitating smoother workflow management.
By grouping resources by client or application type, you can easily track resource usage and costs.
Projects also streamline team collaboration by providing a centralized location for shared resources and access control.
To maximize the effectiveness of projects, regularly review and update your project structure.
As your WordPress deployments evolve, reassign resources, adjust team member access, and create new projects as needed.
This proactive approach guarantees that your DigitalOcean account remains organized and scalable as your WordPress hosting needs grow.
Creating a WordPress Droplet on DigitalOcean
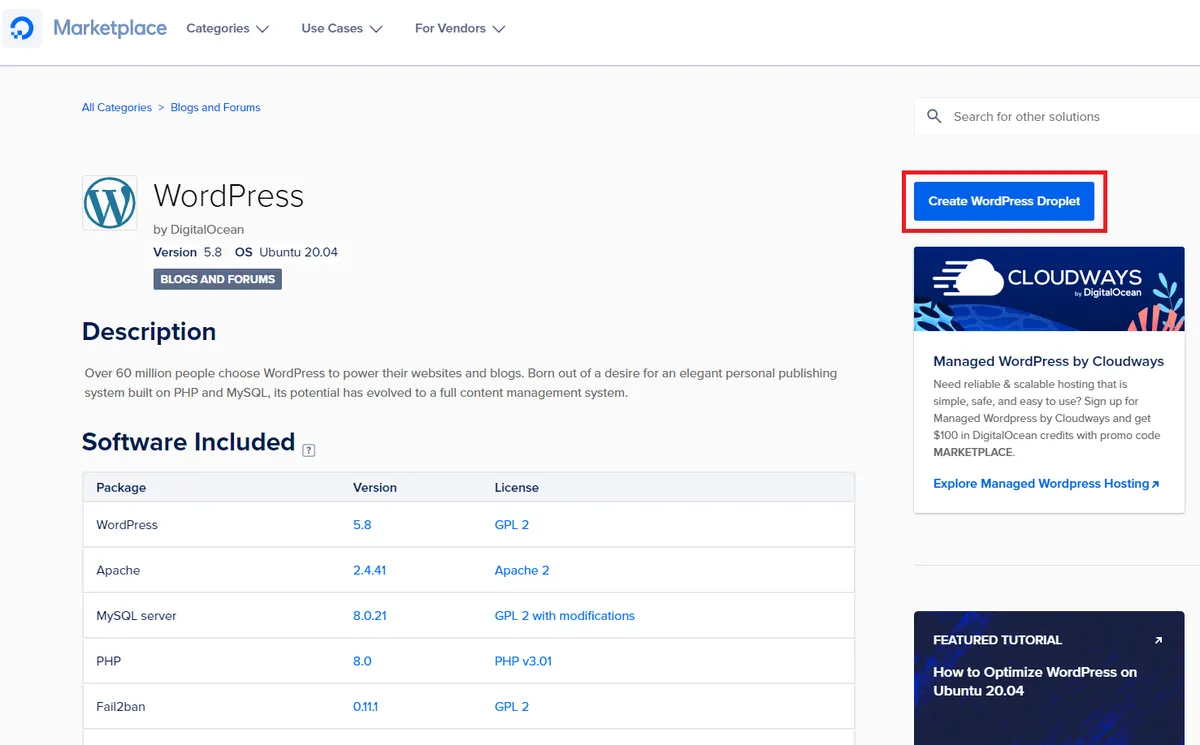
Creating a WordPress droplet on DigitalOcean marks the first crucial step in deploying a WordPress site on this cloud hosting platform. To begin, access your DigitalOcean account and navigate to the droplet creation interface.
When installing WordPress through the DigitalOcean Marketplace, at the time of writing this post, the current version offered is WordPress 6.4.5, paired with Ubuntu 22.04.
Although the current version of WordPress is 6.6.2+, it is possible to update to the latest version once the installation is complete.
On creating a new Droplet for your WordPress site, you will be asked to choose the server Region anda Datacenter.
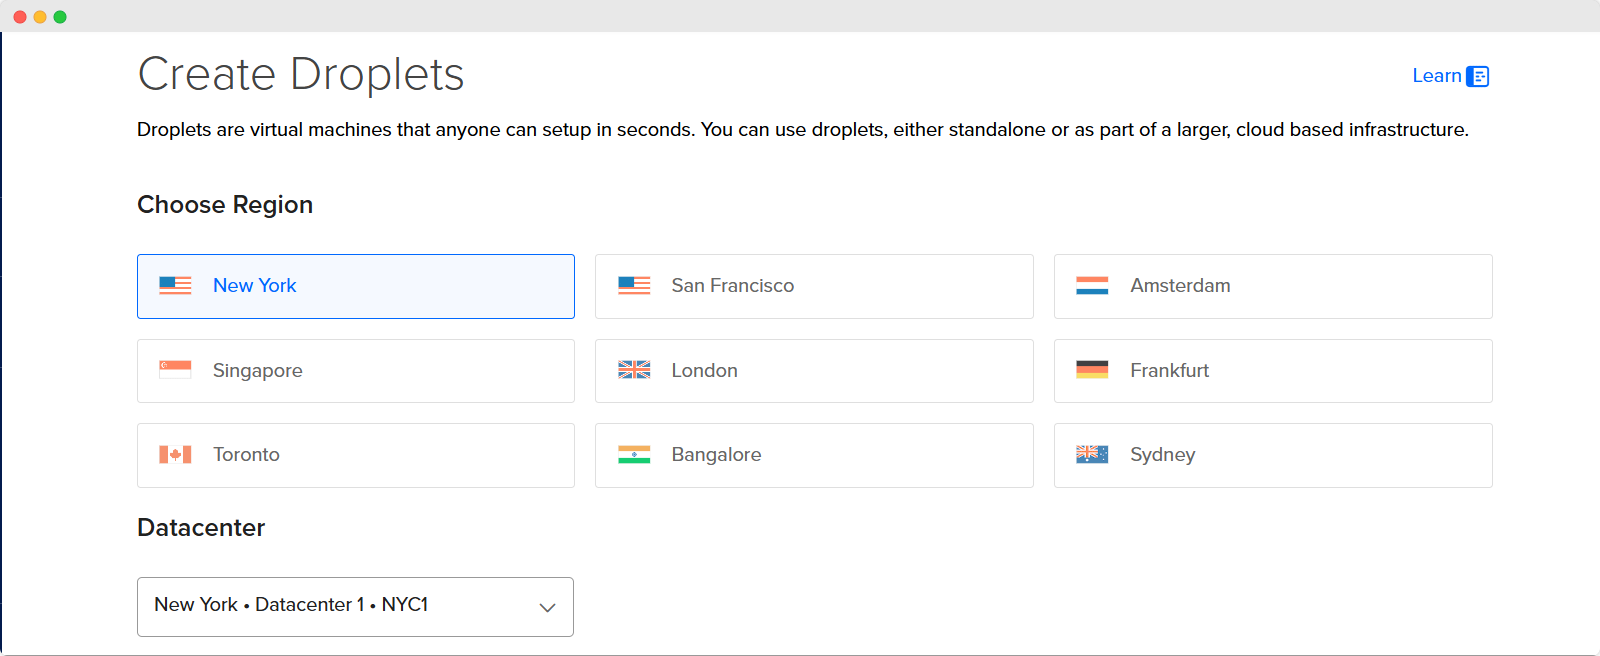
To minimize latency, select a region that is geographically closest to you or your users. A region is an area where we have one or more data centers.
Then, choose Droplet Type and CPU options, depending on your needs and budget.
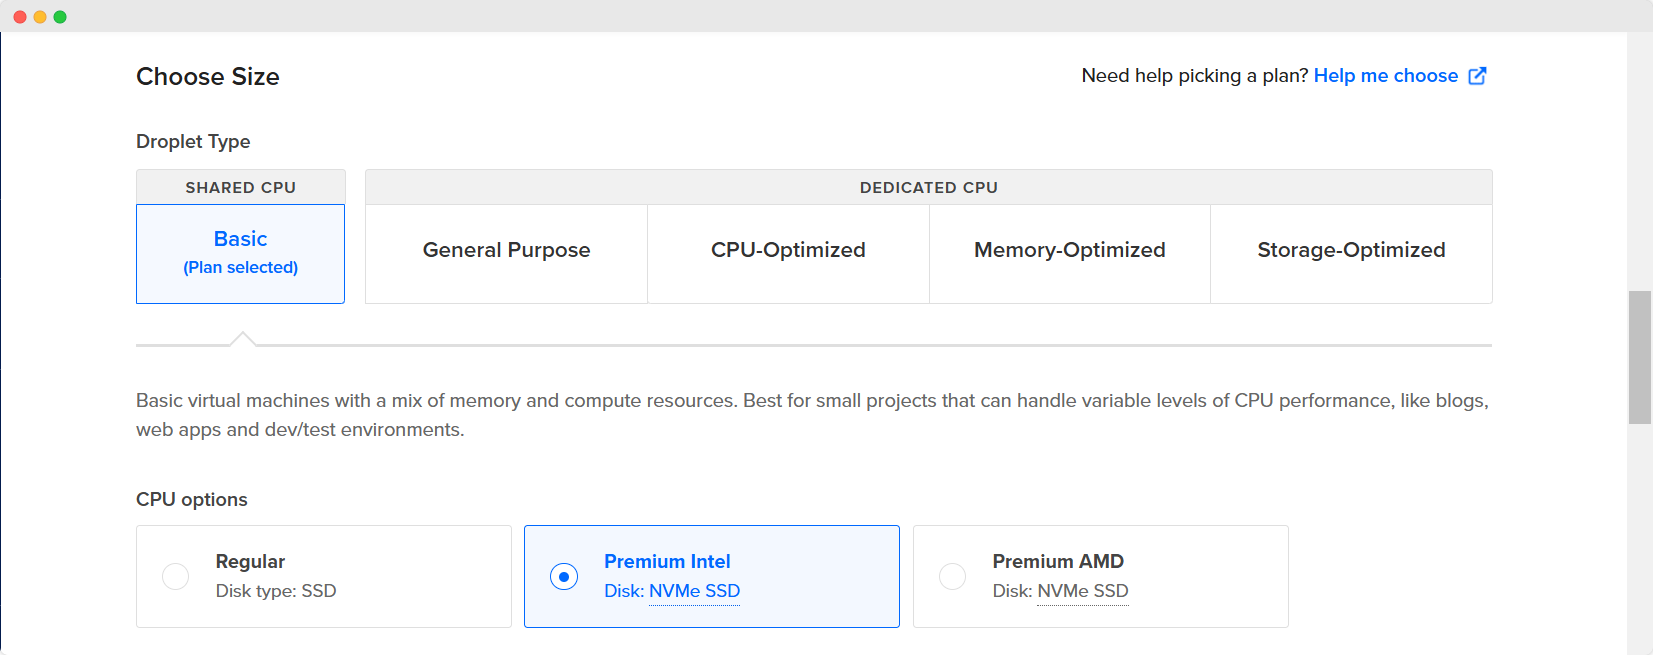
Next, specify your droplet’s resources based on your anticipated traffic and performance requirements. While DigitalOcean offers various configurations, start with a balanced option and scale as needed.
Consider enabling backups for data protection, although this is optional during initial setup. Optionally, you can also add Additional Storage.
Next, you need to Choose Authentication Method between SSH Key and Password. SSH Key is highly recommended.
Droplets that use SSH keys have password authentication disabled by default. This makes them secure and protects them against unauthorized access from brute-force attacks.
If you choose SSH Key, you can add an existing SSH key or create a totally new SSH key. DigitalOcean will help you to generate one in this step.
Next, check the Add improved metrics monitoring and alerting (free) checkbox. It’s free anyway, and helpful along the way.
On Finalize Details section, edit Hostname if needed, make it short and descriptive as possible.
Once you’ve configured the droplet, DigitalOcean will provision your WordPress instance. Upon completion, you’ll receive an IP address.
Access this address via your web browser to finalize the WordPress installation. You’ll be prompted to set up your admin credentials, including username, password, and email address.
After completing these steps, your WordPress droplet will be operational.
The next stages involve configuring your domain name and implementing HTTPS for enhanced security. These processes utilize DigitalOcean’s DNS zone editor and Certbot, a pre-installed SSL certificate tool, respectively.
Accessing DigitalOcean Droplet via SSH
After setting up your WordPress droplet, the next step involves accessing it via SSH (Secure Shell).
SSH provides a secure method to connect to your DigitalOcean server remotely, allowing you to manage your WordPress installation and perform various administrative tasks.
To access your droplet via SSH:
- Open your terminal application (Terminal on macOS/Linux, PuTTY on Windows)
- Enter the command:
ssh root@your_droplet_ip_address - When prompted, enter the root password you received via email
- After successful authentication, you’ll be logged into your droplet’s command line
Once connected, you can navigate the file system, install software, and configure your WordPress environment.
It’s essential to change the root password immediately for security reasons. You can do this by running the ‘passwd’ command and following the prompts.
For enhanced security, consider setting up SSH key authentication instead of password-based login. This involves generating an SSH key pair on your local machine and adding the public key to your droplet’s authorized_keys file.
DigitalOcean’s control panel offers a straightforward interface for managing SSH keys, streamlining this process for users seeking innovative deployment solutions.
Setting Up WordPress on DigitalOcean
When you log in to your WordPress Droplet for the first time using SSH or launch the Droplet console, a WordPress setup script will appear.
If you don’t have a domain yet, you can use your Droplet’s IP address in the setup script when prompted for a domain or subdomain.
To start, enter your domain name. Make sure the domain is set to point to the Droplet’s IP address.
After setting up your A record, you can now enter your domain in the script.
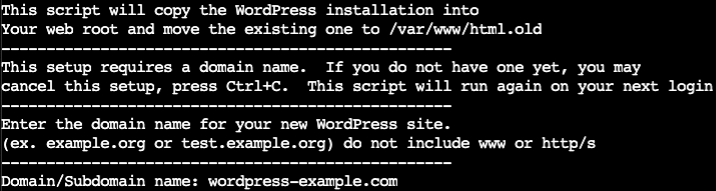
The script will then prompt you to enter user information.
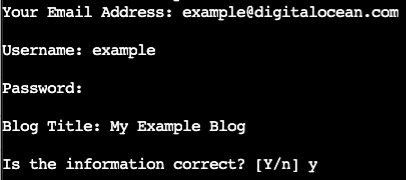
After confirming the data is correct, the script will prompt you to set up HTTPS for your droplet. Configuring HTTPS is recommended because it’s required for using a domain securely.
You will be asked to provide an email address that will receive notifications about security and certificate renewal.
Then, the script will prompt you to select the domain names for which you want to enable HTTPS.
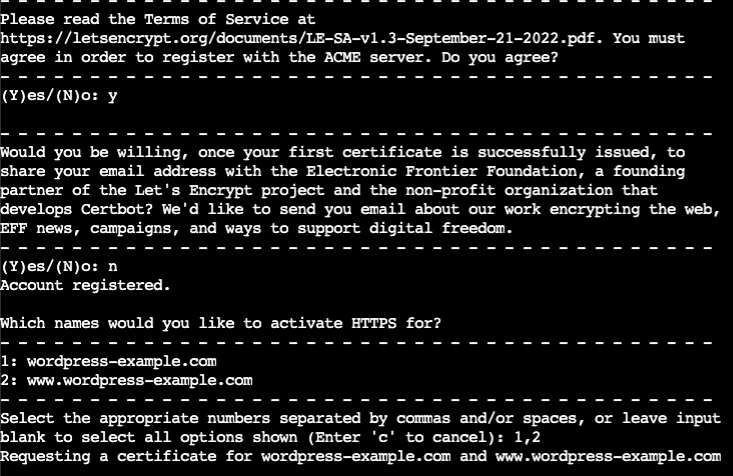
To configure HTTPS, specify both the naked and WWW versions of your domain.
After setting up plugins and completing the installation, which takes a few minutes, you can access your new WordPress site by typing your domain name in the browser. To access the admin console, use the URL https://yourdomain.com/wp-admin.
If you entered an IP address instead of your domain name, you can access the admin console using the URL https://your_IP_address/wp-admin instead.
To enhance your site’s security and accessibility, configure your domain name and add HTTPS. Create an A record in the DNS zone editor, pointing your domain to the droplet’s IP address.
Utilize Certbot, a pre-installed tool on DigitalOcean’s WordPress droplets, to set up an SSL certificate and enable HTTPS.
DigitalOcean’s approach to WordPress hosting combines simplicity with scalability, making it an attractive option for developers and businesses seeking innovative cloud solutions.
The platform’s competitive pricing, community focus, and dynamic resizing capabilities further contribute to its appeal in the WordPress hosting ecosystem.
Advanced WordPress Configuration
Advanced WordPress configuration involves vital steps beyond basic installation.
Setting up a domain name requires creating an A record in the DNS zone editor to link the domain to the droplet’s IP address.
Enabling HTTPS can be accomplished using Certbot, while automating and scheduling backups guarantees data protection and facilitates disaster recovery.
Setting Up a Domain Name
To set up a domain name for your WordPress site on DigitalOcean, begin by adding an A record in your domain’s DNS settings, pointing to your droplet’s IP address.
Once the DNS propagation is complete, access your WordPress dashboard and navigate to the General Settings to update both the WordPress Address (URL) and Site Address (URL) fields with your new domain.
Adding an A Record to the Domain
Configuring a domain name for your WordPress site on DigitalOcean involves adding an A record to your domain’s DNS settings.
This process directs traffic to your DigitalOcean droplet.
Follow these steps:
- Access your domain registrar’s DNS management interface
- Create a new
Arecord - Set the hostname to “
@” or your domain name - Enter your droplet’s IP address as the value
This configuration enables visitors to access your WordPress site using your custom domain.
Changing the WordPress Site URL
After adding the A record to your domain, the next crucial step involves changing the WordPress site URL.
Access your WordPress dashboard and navigate to Settings > General. Modify both the “WordPress Address (URL)” and “Site Address (URL)” fields to reflect your new domain name.
Verify you use “https://” if SSL is configured. Save changes and clear your browser cache to see the updated domain across your site.
Enabling HTTPS on WordPress
Enabling HTTPS on a WordPress site hosted on DigitalOcean involves three key steps. First, obtain an SSL certificate, which can be done using Certbot, a free tool pre-installed on DigitalOcean’s WordPress droplets.
Second, configure the web server to use the SSL certificate. Finally, update the WordPress site URL to use HTTPS.
To enable HTTPS on your WordPress site:
- SSH into your DigitalOcean droplet
- Run Certbot using the command: ‘sudo certbot –apache’
- Follow the prompts to select your domain and choose automatic HTTPS redirection
- Update your WordPress site URL in the settings
After completing these steps, your WordPress site will be secured with HTTPS.
It’s essential to verify that all internal links and resources are now using HTTPS to avoid mixed content warnings.
Additionally, update any hardcoded URLs in your theme or plugins to use HTTPS.
Enabling HTTPS not only enhances security but also improves SEO rankings and user trust.
Regular maintenance is vital to guarantee your SSL certificate remains valid and up-to-date.
Consider implementing automated renewal processes to streamline this task and maintain continuous HTTPS protection for your WordPress site.
Automating and Scheduling Backups
Backups are a critical component of any WordPress site’s maintenance strategy. Automating and scheduling backups on DigitalOcean guarantees data protection and simplifies disaster recovery.
To implement this advanced configuration, utilize DigitalOcean’s built-in backup feature or employ third-party solutions.
Enable DigitalOcean’s weekly backups by accessing the droplet’s settings and activating the backup option. This creates automated snapshots of the entire droplet, including WordPress files and databases.
For more granular control, consider using WordPress plugins like UpdraftPlus or BackupBuddy. These tools offer customizable backup schedules, selective file backups, and cloud storage integration.
To automate database backups, create a cron job that executes a MySQL dump command at specified intervals. Store these backups in a secure off-site location or utilize DigitalOcean Spaces for cloud storage.
Implement a rotation policy to manage backup retention and optimize storage usage.
For enhanced redundancy, combine DigitalOcean’s droplet backups with plugin-based file and database backups. This multi-layered approach guarantees thorough data protection and rapid recovery options in case of system failures or security breaches.
Regularly test the restoration process to verify backup integrity and streamline recovery procedures.
Wrapping Up
SnapShooter provides an effective solution for automated backups of DigitalOcean WordPress installations.
This tool offers scheduled backups, retention policies, and off-site storage options to enhance data security.
DigitalOcean’s WordPress hosting offers a robust platform for website deployment, combining ease of use with scalability and performance.
Using SnapShooter for Backups
One final aspect to ponder in WordPress deployment on DigitalOcean is the implementation of a robust backup solution. SnapShooter offers an efficient and automated approach to safeguarding your WordPress site.
This third-party service integrates seamlessly with DigitalOcean, providing an exhaustive backup strategy for your droplets and databases.
To implement SnapShooter for your WordPress backups:
- Sign up for a SnapShooter account and connect it to your DigitalOcean account
- Configure backup schedules for your WordPress droplet and associated database
- Set retention policies to manage storage utilization effectively
- Enable off-site backups for added redundancy and disaster recovery
SnapShooter’s innovative features include incremental backups, which reduce storage requirements and transfer times.
The service also offers automated backup testing, ensuring the integrity of your backups. With its user-friendly interface and powerful API, SnapShooter allows for easy restoration processes and integration with existing workflows.
Final Thoughts on DigitalOcean WordPress Hosting
As we conclude our exploration of DigitalOcean WordPress hosting, it’s evident that this platform offers a compelling solution for developers and site owners alike.
The combination of competitive pricing, user-friendly features, and robust performance makes DigitalOcean an attractive option for WordPress deployment.
The platform’s 1-click installer streamlines the setup process, allowing users to quickly launch their WordPress sites.
Dynamic resizing capabilities provide the flexibility to scale resources as needed, ensuring the most efficient performance during traffic fluctuations.
DigitalOcean’s community-focused approach fosters collaboration and knowledge sharing, benefiting users of all skill levels.
While DigitalOcean excels in many areas, it’s essential to weigh potential drawbacks. The platform may require more technical expertise compared to managed WordPress hosting solutions.
Users should be prepared to handle server management tasks and security updates independently.
Ultimately, DigitalOcean’s WordPress hosting solution offers a powerful and cost-effective option for those seeking greater control over their hosting environment.
By utilizing DigitalOcean’s infrastructure and tools, developers and site owners can create high-performance WordPress sites tailored to their specific needs.
As with any hosting decision, carefully evaluate your requirements and technical capabilities to determine if DigitalOcean aligns with your project goals and take the time to reflect on the options available.