
How to Create a WordPress Child Theme: An In-Depth Step-by-Step Guide – A WordPress child theme is a theme that inherits the functionality and styling of another theme, called the parent theme.
Creating a child theme is the safest way to modify an existing WordPress theme without losing your customizations when the parent theme is updated.
TL;DR
Hide- A WordPress child theme is a theme that inherits the functionality and styling of another theme, called the parent theme.
- Creating a child theme is the safest way to modify an existing WordPress theme without losing customizations when the parent theme is updated.
- Child themes offer several advantages, including preserving customizations, reusability, and safe experimentation.
- To create a WordPress child theme, you need access to your WordPress site, a text editor, and basic knowledge of HTML, CSS, and PHP (optional).
- To create a child theme, you need to create a new folder in the wp-content/themes directory, and add a style.css file and a functions.php file to the child theme folder.
- The style.css file stores custom CSS and includes metadata for WordPress to recognize the theme, while the functions.php file adds custom PHP code and functionalities.
- To activate the child theme, navigate to Appearance > Themes, and click Activate to set it as the active theme.
- To add custom CSS to the child theme, open the style.css file and add your custom CSS, and to modify template files, copy the files from the parent theme to the child theme and make changes.
- To add custom functions, open the functions.php file and add your custom PHP functions, and to keep the parent theme updated, go to Dashboard > Updates and click Update Now.
- Creating a WordPress child theme is a fundamental technique for customizing a website while safeguarding modifications against potential disruptions from future updates to the parent theme.
Why Use a Child Theme?
Child themes are essential if you plan to customize a WordPress theme. They offer several advantages:
- Preserve Customizations: A child theme allows you to modify the parent theme without losing changes when the parent theme is updated.
- Reusability: Once created, you can reuse your child theme on different projects that use the same parent theme.
- Safe Experimentation: You can experiment with new designs or features in the child theme without affecting the core functionality of the parent theme.
Prerequisites
Before starting, make sure you have the following:
- Access to your WordPress site: This includes either FTP access, cPanel access, or a file manager within the hosting control panel.
- A text editor: Use any code editor such as Sublime Text, Visual Studio Code, or Notepad++.
- Basic knowledge of HTML, CSS, and PHP (optional but helpful).
How to Create a WordPress Child Theme
In this comprehensive guide, you’ll learn how to create a WordPress child theme from scratch with detailed steps to help you understand the process fully.
Step 0: Use My WordPress Child Theme Generator
The quickest way to create a WordPress child theme is to use my own WordPress Child Theme Generator tool.
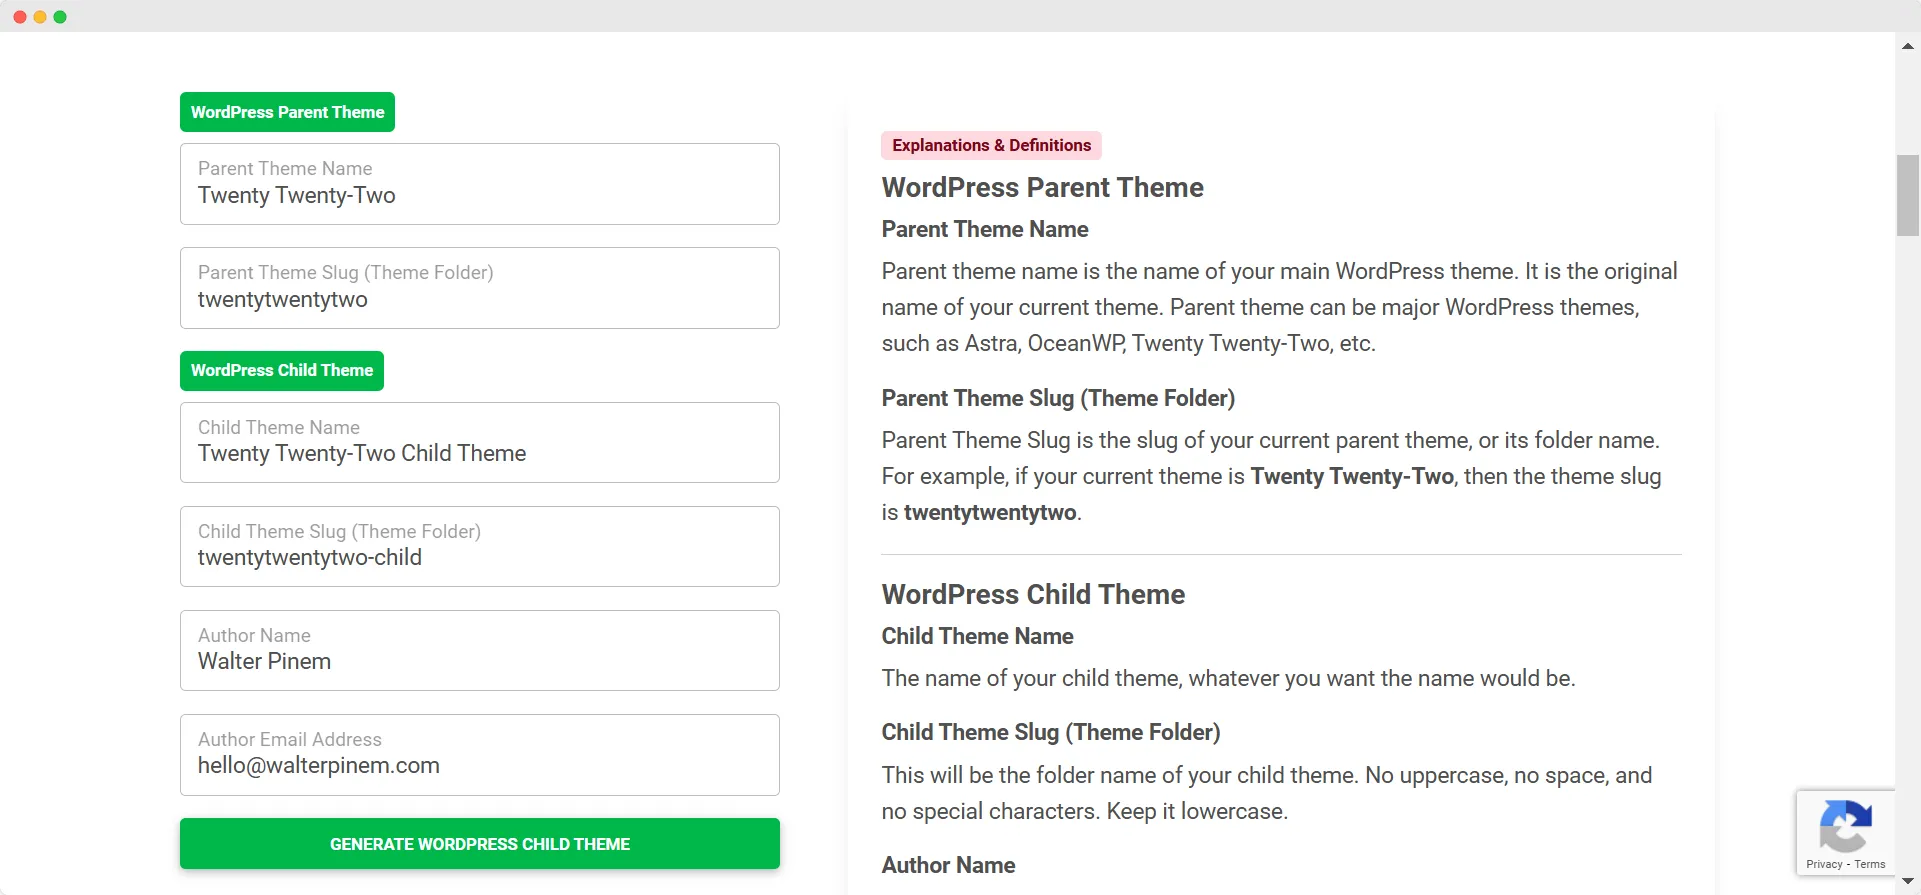
All you have to do is fill the form with needed information, and once done, click the Generate WordPress Child Theme button.
You will be able to download the .zip file containing all files.
Otherwise, if you want to learn to do it manually whilst learning, please continue reading.
Step 1: Access Your WordPress Files
To create a child theme, you need access to the wp-content/themes directory of your WordPress installation. You can access this directory via:
- FTP: Use an FTP client like FileZilla to connect to your server.
- cPanel File Manager: Many web hosts provide access to a file manager where you can navigate through your WordPress files.
- WordPress Plugin: Alternatively, you can use a plugin like “WP File Manager” to access files directly from the WordPress dashboard.
Once inside the wp-content/themes directory, you will find the folders for your active parent themes.
Step 2: Create a Child Theme Directory
In the wp-content/themes directory, create a new folder for your child theme. The folder name should be relevant to the parent theme and easy to identify.
Example: If your parent theme is named twentytwentyone, you can name your child theme folder twentytwentyone-child.
Steps:
- Navigate to
wp-content/themes. - Create a new folder named
twentytwentyone-child(or a similar name relevant to your parent theme).
Step 3: Create a style.css File
The next step is to create a style.css file for your child theme. This file will store your custom CSS and include the required metadata for WordPress to recognize the theme.
Steps:
- Inside the
twentytwentyone-childfolder, create a new file namedstyle.css. - Open the file in your code editor and add the following code:
/*
 Theme Name:     Twenty Twenty-One Child
 Theme URI:      http://example.com/twentytwentyone-child
 Description:    A child theme for the Twenty Twenty-One theme
 Author:         Your Name
 Author URI:     http://example.com
 Template:       twentytwentyone
 Version:        1.0.0
*/

/* Custom CSS for the child theme goes below this line */
Explanation:
- Theme Name: This is the name of your child theme. It will appear in the WordPress admin under Appearance > Themes.
- Theme URI: Optional field for the theme’s homepage.
- Description: A brief description of the theme.
- Author: Your name or company name.
- Author URI: Optional field for the author’s website.
- Template: The folder name of the parent theme. This is crucial for the child theme to work.
- Version: The version number of the child theme.
Step 4: Create a functions.php File
The functions.php file in your child theme allows you to add custom PHP code and functionalities. It is also necessary for correctly enqueuing the parent theme’s stylesheets.
Steps:
- In the
twentytwentyone-childfolder, create a new file namedfunctions.php. - Open the file in your code editor and add the following code:
<?php
// Enqueue parent theme styles
function twentytwentyone_child_enqueue_styles() {
    // Enqueue the parent theme style.css
    wp_enqueue_style('parent-style', get_template_directory_uri() . '/style.css');
}
add_action('wp_enqueue_scripts', 'twentytwentyone_child_enqueue_styles');
Explanation:
- wp_enqueue_style: This function loads the parent theme’s
style.cssfile into the child theme. - get_template_directory_uri(): This retrieves the URL of the parent theme directory.
By enqueuing the parent theme styles, your child theme inherits the CSS of the parent theme, allowing you to make modifications only where needed.
Step 5: Activate the Child Theme
Now that you’ve created the necessary files, you can activate the child theme from the WordPress dashboard.
Steps:
- Log in to your WordPress admin dashboard.
- Navigate to Appearance > Themes.
- You should see your child theme listed here (e.g., “Twenty Twenty-One Child”).
- Click Activate to set it as the active theme.
Step 6: Add Custom CSS to the Child Theme
Once the child theme is activated, you can start adding custom styles. Open the style.css file in your child theme and add your custom CSS.
Example Custom CSS:
/* Change the background color of the site */
body {
    background-color: #f0f0f0;
}

/* Style the header */
header {
    background-color: #333;
    color: white;
    padding: 20px;
}

/* Style post titles */
h1.entry-title {
    font-size: 2.5em;
    color: #0073aa;
}
Save the file, and your custom styles will be applied immediately.
Step 7: Modify the Template Files (Optional)
One of the key advantages of a child theme is the ability to modify template files from the parent theme.
For example, if you want to customize the header.php file, you can copy it from the parent theme to your child theme and make changes.
Steps:
- Navigate to the parent theme folder (
wp-content/themes/twentytwentyone). - Copy the
header.phpfile. - Paste it into the child theme folder (
wp-content/themes/twentytwentyone-child). - Open the
header.phpfile in the child theme and make your changes.
WordPress will now use the modified header.php file from the child theme, overriding the one in the parent theme.
Step 8: Add Custom Functions (Optional)
You can add custom PHP functions to the functions.php file of your child theme. These functions will override or extend the functionality of the parent theme.
Example: Adding a Custom Widget Area
In the functions.php file of your child theme, you can register a custom widget area:
<?php
// Enqueue parent theme styles
function twentytwentyone_child_enqueue_styles() {
    wp_enqueue_style('parent-style', get_template_directory_uri() . '/style.css');
}
add_action('wp_enqueue_scripts', 'twentytwentyone_child_enqueue_styles');

// Register a new widget area
function twentytwentyone_child_widgets_init() {
    register_sidebar(array(
        'name' => 'Custom Widget Area',
        'id' => 'custom-widget-area',
        'before_widget' => '<div class="custom-widget">',
        'after_widget' => '</div>',
        'before_title' => '<h3 class="widget-title">',
        'after_title' => '</h3>',
    ));
}
add_action('widgets_init', 'twentytwentyone_child_widgets_init');
This code registers a new widget area that you can use in your theme’s sidebar or footer.
Step 9: Keep the Parent Theme Updated
One of the significant advantages of using a child theme is that you can update the parent theme without losing your customizations. Always keep your parent theme updated for security and performance improvements.
Steps to Update the Parent Theme:
- Go to Dashboard > Updates.
- If an update for the parent theme is available, click Update Now.
Since all your customizations are stored in the child theme, they will remain intact after the update.
Final Thoughts
Creating a WordPress child theme is a fundamental technique for customizing a website while safeguarding modifications against potential disruptions from future updates to the parent theme.
Also read: Complete Guide to WordPress Plugin Updates via TortoiseSVN
Through the steps outlined in this guide, users of all experience levels – from beginners to advanced WordPress users – have gained the knowledge necessary to create a child theme, integrate the parent theme’s styles, and initiate customizations to both the appearance and functionality of their site.
Utilizing a child theme represents the most efficient and secure approach to theme modification. Happy coding!